Occasionally there is a need to patch an ESXi host without using Update Manager. It may be that Update Manager isn’t installed, or that there are network restrictions in place or that the host is standalone and not connected to vCenter. I recently had to patch such a host, so thought I’d run through the process here whilst saying a few words in general on patching hosts without using Update Manager.
The starting point when patching standalone hosts should be the VMware Patch Download Portal. In my case I want to patch an ESXi 5.0 Host:
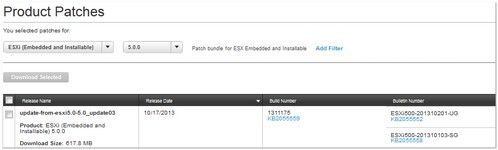
The most recent, at the time of writing, is update-from-esxi5.0-5.0_update03. As well as the download link, there is a link to the KB article which will give you more information on a specific fix or update. The next step for me was to download the update .zip file and upload it to a VMFS datastore accessible to my standalone host.
It’s worth mentioning at this point that ESXi patches are cumulative, in that to bring your host up to date you only need to install the most recent patch and not all the preceding ones. For example, the host I wish to patch is running the following version:
~ # esxcli system version get
   Product: VMware ESXi
   Version: 5.0.0
   Build: Releasebuild-469512
   Update: 0
   Patch: 0
There have been a number of patch releases since this version (build 469512) and now, however, to get the host up to date we only need to apply the most recent
– update-from-esxi5.0-5.0_update03.
Before starting, the host should be put into Maintenance Mode, with any running VMs being shutdown (or migrated elsewhere if this was part of a cluster). Now we need to query the image profiles that are available as part of the patch. This is done by running the following:
~ # esxcli software sources profile list --depot=/vmfs/volumes/datastore1/patch/update-from-esxi5.0-5.0_update03.zip
Name                              Vendor        Acceptance Level
--------------------------------  ------------  ----------------
ESXi-5.0.0-20131002001-standard   VMware, Inc.  PartnerSupported
ESXi-5.0.0-20131001001s-standard  VMware, Inc.  PartnerSupported
ESXi-5.0.0-20131001001s-no-tools  VMware, Inc.  PartnerSupported
ESXi-5.0.0-20131002001-no-tools   VMware, Inc.  PartnerSupported
The Image Profile I wish to install is ‘ESXi-5.0.0-20131002001-standard’. Now we have the name of the image profile we wish to update the host to, we can look at installing it. That is done by using the ‘esxcli software profile’ namespace. The usage options are shown below:
~ # esxcli software profile
Usage: esxcli software profile {cmd} [cmd options]

Available Commands:
  get                   Display the installed image profile and host acceptance level.
  install               Installs or applies an image profile from a depot to this host. This command completely replaces the installed image with the image
                        defined by the new image profile, and may result in the loss of installed VIBs. To preserve installed VIBs, use profile update instead.
                        WARNING: If your installation requires a reboot, you need to disable HA first.
  update                Updates the host with VIBs from an image profile in a depot. Installed VIBs may be upgraded (or downgraded if --allow-downgrades is
                        specified), but they will not be removed. Any VIBs in the image profile which are not related to any installed VIBs will be added to
                        the host. WARNING: If your installation requires a reboot, you need to disable HA first.
  validate              Validates the current image profile on the host against an image profile in a depot.

In our case we want to use the ‘update’ command as we have VIBs (EMC PowerPatch is an example) that would be removed if we did an ‘install’. Before performing the install it is recommended to use the –dry-run option first to see what will be updated:
~ #  esxcli software profile update --depot=/vmfs/volumes/datastore1/patch/update-from-esxi5.0-5.0_update03.zip --dry-run --profile=ESXi-5.0.0-20131002001-standard
Update Result
   Message: Dryrun only, host not changed. The following installers will be applied: [BootBankInstaller]
   Reboot Required: true
   VIBs Installed: VMware_bootbank_ehci-ehci-hcd_1.0-3vmw.500.1.11.623860, VMware_bootbank_esx-base_5.0.0-3.41.1311175, VMware_bootbank_esx-tboot_5.0.0-2.26.914586, VMware_bootbank_ipmi-ipmi-si-drv_39.1-4vmw.500.2.26.914586, VMware_bootbank_misc-drivers_5.0.0-3.41.1311175, VMware_bootbank_net-be2net_4.0.88.0-1vmw.500.0.7.515841,
VIBs Removed: VMware_bootbank_ehci-ehci-hcd_1.0-3vmw.500.0.0.469512, VMware_bootbank_esx-base_5.0.0-0.0.469512, VMware_bootbank_esx-tboot_5.0.0-0.0.469512, VMware_bootbank_ipmi-ipmi-si-drv_39.1-4vmw.500.0.0.469512, VMware_bootbank_misc-drivers_5.0.0-0.0.469512, VMware_bootbank_net-be2net_4.0.88.0-1vmw.500.0.0.469512,

The VIBs that will be updated, and those that won’t are displayed. Please note that I’ve edited the above output for brevity. Once satisfied, you can begin the update by running the same command, whilst omitting the dry-run option:
~ #  esxcli software profile update --depot=/vmfs/volumes/datastore1/patch/update-from-esxi5.0-5.0_update03.zip --profile=ESXi-5.0.0-20131002001-standard        Update Result
   Message: The update completed successfully, but the system needs to be rebooted for the changes to be effective.
   Reboot Required: true

We can see the updates have been installed and that a reboot will need to be carried out.
~ # reboot
Once the host has booted back up we can check the build version, running the same command as earlier:
~ # esxcli system version get
   Product: VMware ESXi
   Version: 5.0.0
   Build: Releasebuild-1311175
   Update: 3
We can see that the build is now 1311175. One final check we can do is to validate the hosts new build/image profile with the one in our downloaded update:
~ # esxcli software profile validate --depot=/vmfs/volumes/datastore1/patch/update-from-esxi5.0-5.0_update03.zip --profile=ESXi-5.0.0-20131002001-standard