User photos stored in Active Directory can be used by applications like Outlook, Skype for Business (Lync) or SharePoint to display the picture of currently logged-in user in their interface. However, you can take even more advantage of Active Directory photos and use them as account pictures in Windows 10 (and other versions of Windows as well, starting from Windows 7). All you have to do is make sure that you already have user photos added in Active Directory (or add them yourself) and create a Group Policy object (GPO) that will execute a script to change users’ account pictures in your domain automatically. Optionally, you may also need to globally change some of the users’ privileges, but we’ll get back to that later. Some of these steps can easily be done using CodeTwo Active Directory Photos, which is completely free! As for the other steps, this article will guide you through them smoothly.
Take a good look at this default account picture, as you will probably see it for the last time:

Follow these steps to use Active Directory user photos in Windows 10
- Import photos into Active Directory
- Create a new GPO for your domain
- Add a logoff script to GPO
- Add registry key permissions in GPO
Importing photos into Active Directory
There is a simple Set-ADUser cmdlet that can be used to import user photos to Active Directory. It saves an image file in the thumbnailPhoto Active Directory attribute. An example of the command that needs to be run in PowerShell looks as follows:
$ADphoto = [byte[]](Get-Content <path to file> -Encoding byte)

Set-ADUser <username> -Replace @{thumbnailPhoto=$ADphoto}
Just remember to provide an exact path to the image file and the user’s name (learn about other ways of identifying your Active Directory users in this MS TechNet article), for example:
$ADphoto = [byte[]](Get-Content C:\AD_Photos\ad-brian-johnson -Encoding byte)

Set-ADUser BrianJ -Replace @{thumbnailPhoto=$ADphoto}
Of course, this is a no-go when you want to import photos for a lot of users. A similar command can be used to import multiple pictures into Active Directory. But first, you need to prepare a CSV file with the list of users and their respective photos. Here’s an example content of such a file:
AD_user, path_to_file

AlexD , C:\AD_Photos\ad-alex-darrow.jpg

AnneW, C:\ AD_Photos\ad-anne-wallace.jpg

BrianJ, C:\ AD_Photos\ad-brian-johnson.png
Once the file is ready, use the following command:
Import-Csv C:\AD_Photos\photos.csv |%{Set-ADUser -Identity $_.AD_user -Replace @{thumbnailPhoto=([byte[]](Get-Content $_.path_to_file -Encoding byte))}}
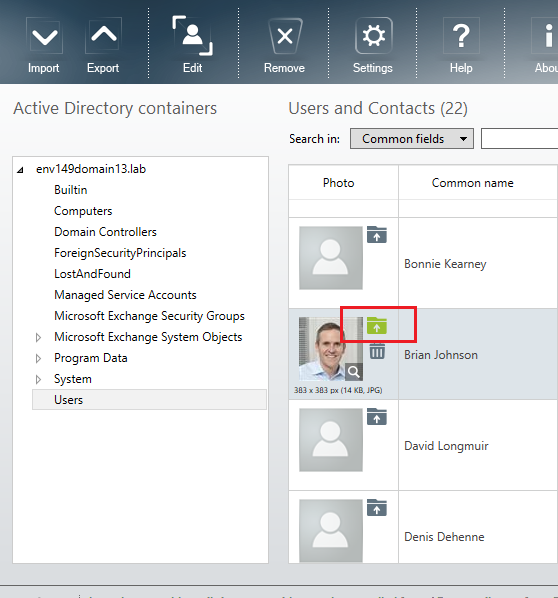
Creating such a file can also be quite time-consuming. This is where CodeTwo Active Directory Photos comes into play. The program not only allows you to quickly connect to Active Directory and import (single or multiple) files, but it comes with the ability to match photos automatically with respective Active Directory users. Plus, you can do all that from an intuitive and user-friendly interface.
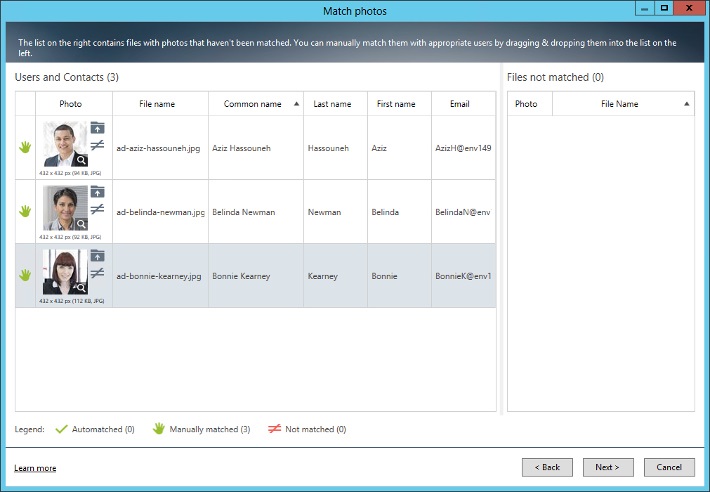
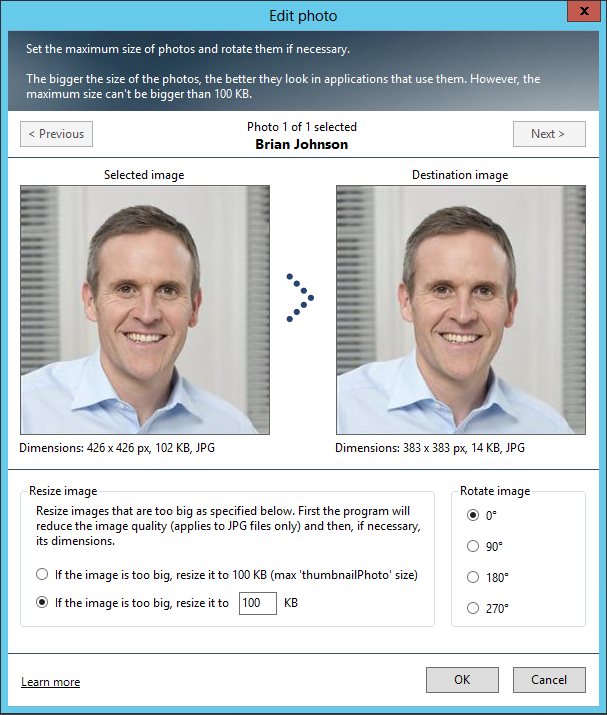
There is also one important aspect that hasn’t been mentioned yet – the photo stored in the thumbnailPhoto attribute cannot be bigger than 100 kB, and the recommended size is 96 x 96 pixels. Here you can also make use of CodeTwo Active Directory Photos, as it lets you adjust both the size of the file as well as its dimensions.
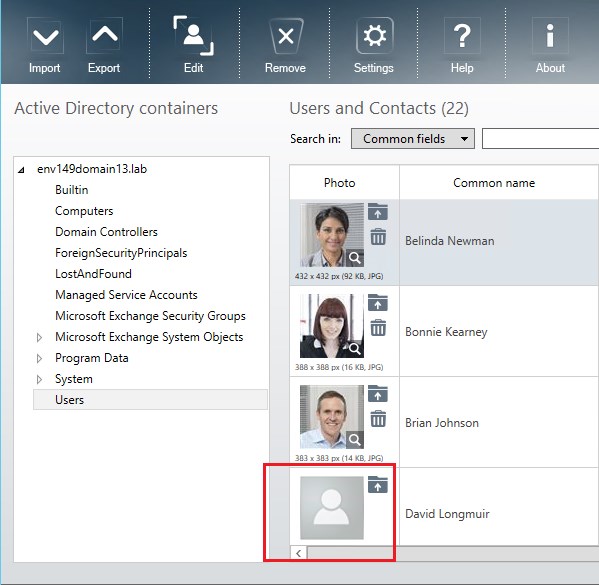
With this program, you will also instantly know which users don’t have their photos added to Active Directory by merely looking at the user’s list.
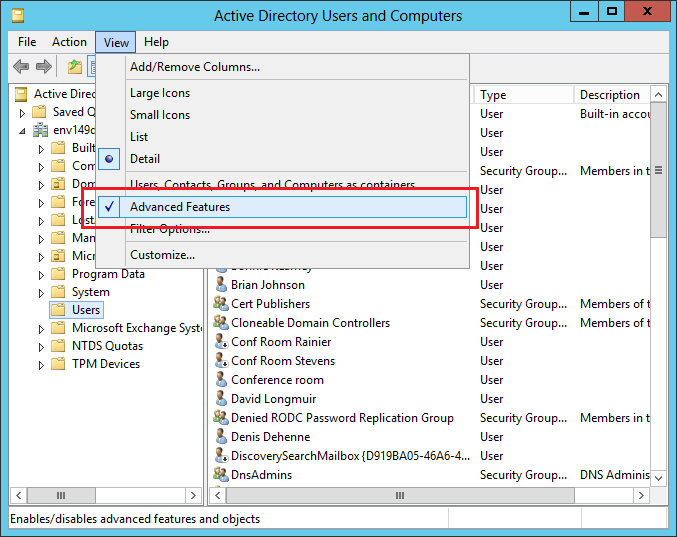
Otherwise, you can, for example, open the Active Directory Users and Computers tool and check if the thumbnailPhoto attribute shows any value. If you see <not set>, it means there is no photo there.
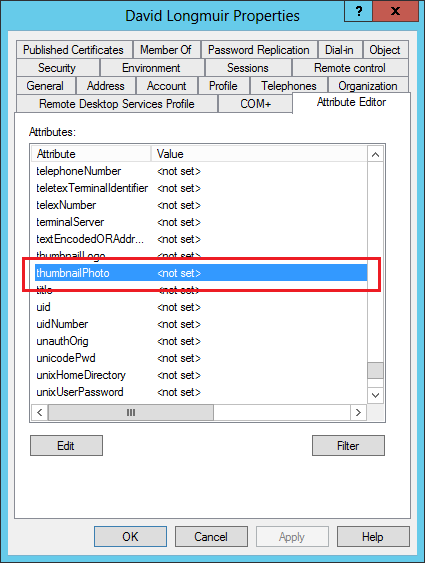
If you can’t find the Attribute Editor tab in the Properties window, make sure the Advanced Features options on the View menu is checked.
Creating a new GPO for your domain
Now, to propagate these Active Directory photos as Windows 10 account pictures, you can make use of Group Policy objects. Or more specifically – a Group Policy logoff scripts. They are used to perform automated tasks on each machine in a specified domain when a user logs off in Windows. That way, changes are introduced without any conflicts and even without any interaction on users’ part.
The script that we’re going to use was found on this site. You can adjust this code to your needs, or just copy it as it is and paste it into an empty text document. Save the file and change its extension from .txt to .ps1. Next, copy the file to a network location, e.g. %logonserver%\netlogon.
[CmdletBinding(SupportsShouldProcess=$true)]Param()

function Test-Null($InputObject) { return !([bool]$InputObject) }

Function ResizeImage() {

param([String]$ImagePath, [Int]$Quality = 90, [Int]$targetSize, [String]$OutputLocation)

Add-Type -AssemblyName "System.Drawing"

$img = [System.Drawing.Image]::FromFile($ImagePath)

$CanvasWidth = $targetSize

$CanvasHeight = $targetSize

#Encoder parameter for image quality

$ImageEncoder = [System.Drawing.Imaging.Encoder]::Quality

$encoderParams = New-Object System.Drawing.Imaging.EncoderParameters(1)

$encoderParams.Param[0] = New-Object System.Drawing.Imaging.EncoderParameter($ImageEncoder, $Quality)

# get codec

$Codec = [System.Drawing.Imaging.ImageCodecInfo]::GetImageEncoders() | Where {$_.MimeType -eq 'image/jpeg'}

#compute the final ratio to use

$ratioX = $CanvasWidth / $img.Width;

$ratioY = $CanvasHeight / $img.Height;

$ratio = $ratioY

if ($ratioX -le $ratioY) {

$ratio = $ratioX

}

$newWidth = [int] ($img.Width * $ratio)

$newHeight = [int] ($img.Height * $ratio)

$bmpResized = New-Object System.Drawing.Bitmap($newWidth, $newHeight)

$graph = [System.Drawing.Graphics]::FromImage($bmpResized)

$graph.InterpolationMode = [System.Drawing.Drawing2D.InterpolationMode]::HighQualityBicubic

$graph.Clear([System.Drawing.Color]::White)

$graph.DrawImage($img, 0, 0, $newWidth, $newHeight)

#save to file

$bmpResized.Save($OutputLocation, $Codec, $($encoderParams))

$bmpResized.Dispose()

$img.Dispose()

}

#get sid and photo for current user

$user = ([ADSISearcher]"(&(objectCategory=User)(SAMAccountName=$env:username))").FindOne().Properties

$user_photo = $user.thumbnailphoto

$user_sid = [System.Security.Principal.WindowsIdentity]::GetCurrent().User.Value

Write-Verbose "Updating account picture for $($user.displayname)..."

#continue if an image was returned

If ((Test-Null $user_photo) -eq $false)

{

Write-Verbose "Success. Photo exists in Active Directory."

#set up image sizes and base path

$image_sizes = @(32, 40, 48, 96, 192, 200, 240, 448)

$image_mask = "Image{0}.jpg"

$image_base = "C:\ProgramData\AccountPictures"

#set up registry

$reg_base = "HKLM:\SOFTWARE\Microsoft\Windows\CurrentVersion\AccountPicture\Users\{0}"

$reg_key = [string]::format($reg_base, $user_sid)

$reg_value_mask = "Image{0}"

If ((Test-Path -Path $reg_key) -eq $false) { New-Item -Path $reg_key }

#save images, set reg keys

ForEach ($size in $image_sizes)

{

#create hidden directory, if it doesn't exist

$dir = $image_base + "\" + $user_sid

If ((Test-Path -Path $dir) -eq $false) { $(mkdir $dir).Attributes = "Hidden" }

#save photo to disk, overwrite existing files

$file_name = ([string]::format($image_mask, $size))

$pathtmp = $dir + "\_" + $file_name

$path = $dir + "\" + $file_name

Write-Verbose " saving: $file_name"

$user_photo | Set-Content -Path $pathtmp -Encoding Byte -Force

ResizeImage $pathtmp $size $size $path

Remove-Item $pathtmp

#save the path in registry, overwrite existing entries

$name = [string]::format($reg_value_mask, $size)

$value = New-ItemProperty -Path $reg_key -Name $name -Value $path -Force

}

Write-Verbose "Done."

} else { Write-Error "No photo found in Active Directory for $env:username" }
What does this script do? Generally, it exports the photo stored in the thumbnailPhoto attribute and saves it on your machine, in a specified folder (in this case: C:\ProgramData\AccountPictures\{User SID}). You will notice that there will be eight JPG files stored in this folder, each of different size (from 32×32 px to 448×448 px), and name, specifying photo’s size (Image32.jpg, Image96.jpg, etc.). Additionally, new registry keys will be created under MACHINE\SOFTWARE\Microsoft\Windows\CurrentVersion\AccountPicture\Users\{User SID} in the Windows registry, with paths to these photos.
To create a new GPO, open Group Policy Management console (if you can’t find it, follow these steps to install it), find your domain in the console tree, right-click it and select Create a GPO in this domain, and Link it here.
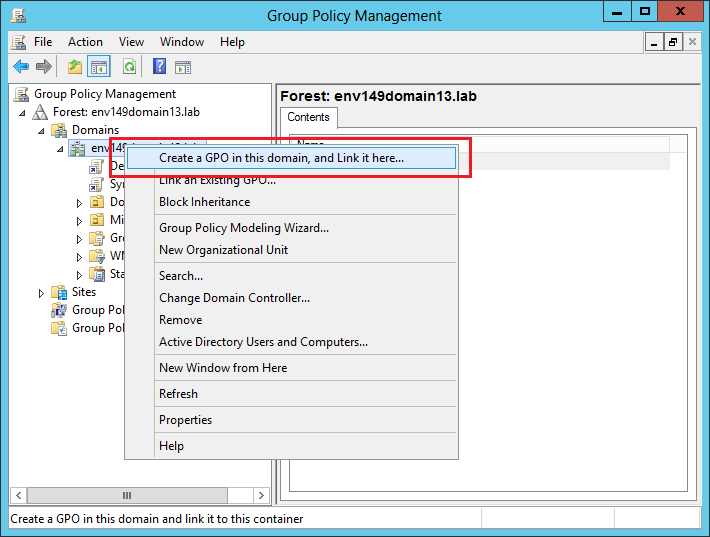
Provide any name you want and click OK. A new GPO will appear under Group Policy Objects.

Adding a logoff script to GPO
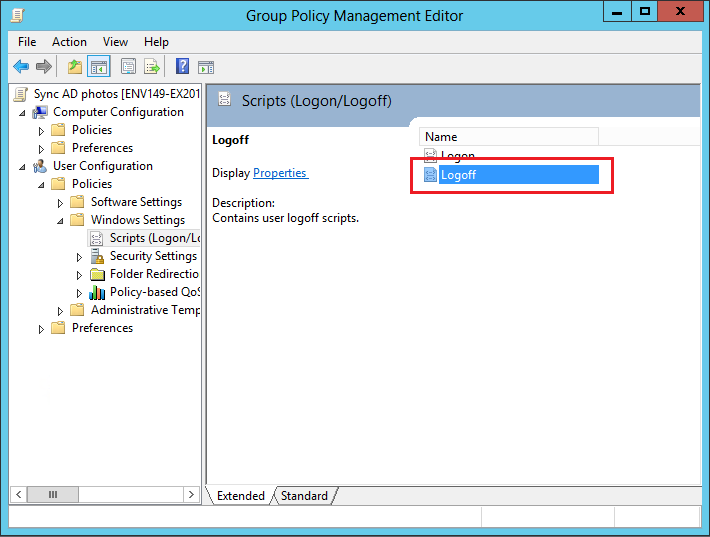
Right-click this GPO and choose Edit. The Group Policy Management Editor window will open. Navigate to User Configuration > Policies > Windows Settings > Scripts (Logon/Logoff), and then double-click Logoff in the right pane.
In the Logoff Properties window, go to the PowerShell Scripts tab. Click Add > Browse and point to the PS1 script file in the %logonserver%\netlogon path. Leave the Script Parameters field empty.
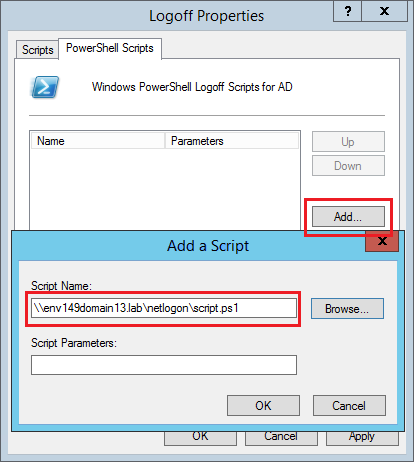
When done, just click OK two times.
And this should do the trick. The next time a user logs off from any machine in this domain and logs in again, the account picture should update automatically. However, this will only work if users in your domain have local administrative privileges assigned. If not, there is one more thing you need to do. And it also involves GPO.

Adding registry key permissions in GPO
Remember the registry key mentioned before? The key MACHINE\SOFTWARE\Microsoft\Windows\CurrentVersion\AccountPicture\Users is where the information about the account picture is stored. Users cannot change their account pictures unless they are granted Full Control permission to that key. This can also be done via GPO. You can even use the same one you’ve created to run the logoff script.
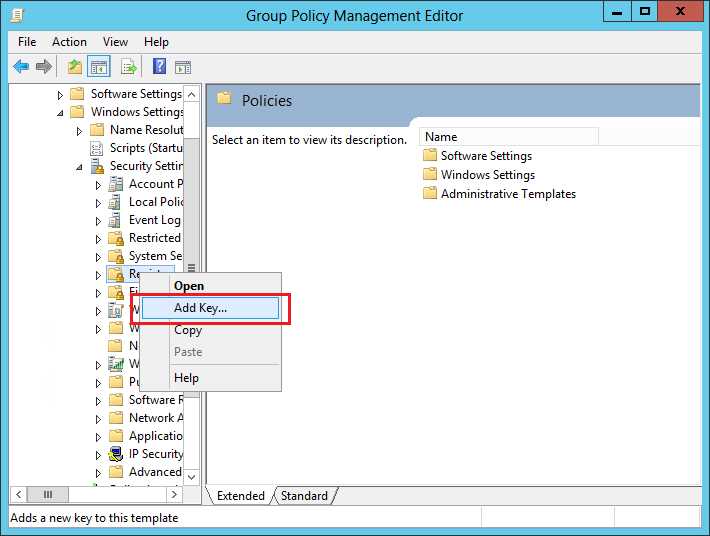
Back in the Group Policy Management Editor, go to Computer Configuration > Policies > Windows Settings > Security Settings, right-click the Registry node and select Add Key.
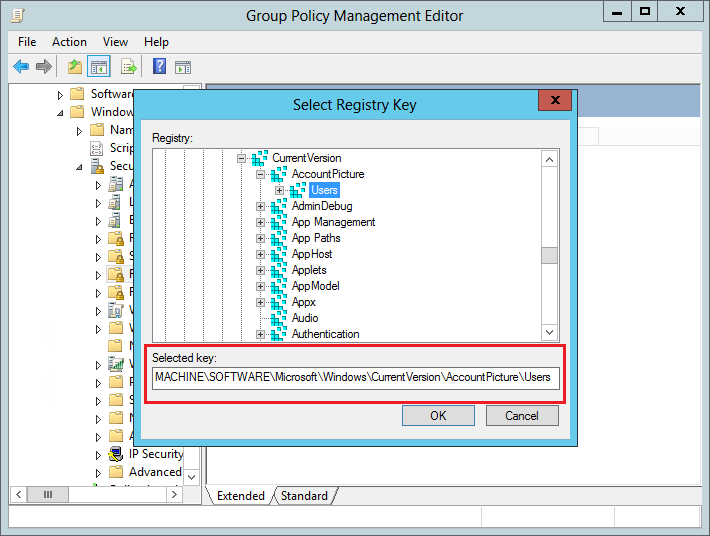
Navigate to MACHINE\SOFTWARE\Microsoft\Windows\CurrentVersion\AccountPicture\Users (or just copy this key and paste it under the Selected key field) and click OK.
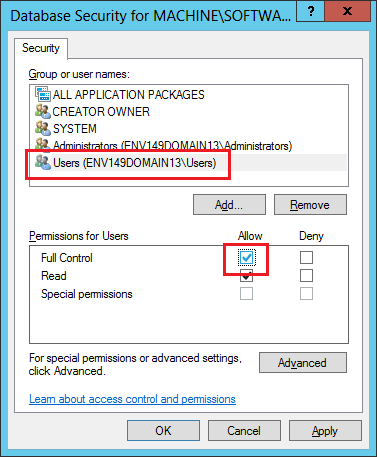
Select Users under Group or user names and tick the Allow checkbox next to Full Control.
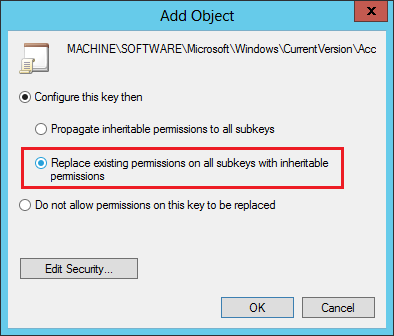
Once you click OK, another window will open. Select the Replace existing permissions on all subkeys with inheritable permissions option and click OK.
Now, it may take some time for the GPO to make the change in the Registry Editor – it is usually also required to restart the client machine. But once a non-admin user has full access to the registry key in question, and once they sign out and in again, their profile picture should be updated.
But there is one more thing CodeTwo Active Directory Photos can do for you. Once you have deployed the logoff script, it will be executed every time a user logs off (until you delete this GPO). Thanks to that, you can use this free tool to quickly change user photos in the Active Directory, and the account pictures will also change automatically.
You can use this feature to, for example, change user photos for the upcoming holiday season or any important events affecting your company.
To sum up, using Active Directory user photos to personalize profile pictures in Windows 10 is quite an easy task that won’t take long to complete. Plus, as mentioned at the beginning of this article, these photos will also be used in programs like Skype or Outlook. Use this opportunity to personalize your email signatures as well!
Further reading
How to add, edit, manage or remove Active Directory photographs
How to manage users’ photos in Microsoft Lync, Outlook and Exchange Server