Summary: This document describes how to install SQL 2014 Standard Edition in a failover configuration. This configuration uses SQL servers in an active/passive mode.
Audience: customers who have SQL server Standard Edition and wish to create a failover SQL cluster configuration.
![]() It is the full responsibility of the IT department to configure the SQL failover configuration. XMPie does not provide support for this process, nor is XMPie liable in any way for its results.
It is the full responsibility of the IT department to configure the SQL failover configuration. XMPie does not provide support for this process, nor is XMPie liable in any way for its results.
Overview
Windows Server Failover Clustering (WSFC) is a high-availability and disaster recovery solution designed to increase the uptime of SQL Server instances. A cluster is a group of independent servers, called nodes, that work together to increase the availability of applications and services that run on the cluster. One is identified as the active node, on which a SQL Server instance is running the production workload, and the other is a passive node, on which SQL Server is installed but not running. If the SQL Server instance on the active node fails, the passive node becomes the active node and begins to run the SQL Server production workload with minimal failover downtime. This process is known as failover.
What Clustering Can Do
Clustering is designed to improve the availability of the physical server hardware, operating system, and SQL Server instances but excluding the shared storage. Should any of these aspects fail, the SQL Server instance fails over. The other node in a cluster automatically takes over the failed SQL Server instance to reduce downtime to a minimum.
Additionally, the use of a Windows Failover Cluster can help reduce downtime when you perform maintenance on cluster nodes. For example, if you need to update hardware on a physical server or install a new service pack on the operating system, you can do so one node at a time.
Terms and Definitions
Failover cluster instance: An instance of a Windows service that manages an IP address resource, a network name resource, and additional resources that are required to run one or more applications or services. Clients can use the network name to access the resources in the group, similar to using a computer name to access the services on a physical server. However, because a failover cluster instance is a group, it can be failed over to another node without affecting the underlying name or address.
Node: A Microsoft Windows Server system that is an active or inactive member of a server cluster.
Cluster resource: A physical or logical entity that can be owned by a node, brought online and taken offline, moved between nodes, and managed as a cluster object. A cluster resource can be owned by only a single node at any point in time.
Resource group: A collection of cluster resources managed as a single cluster object. Typically, a resource group contains all of the cluster resources that are required to run a specific application or service. Failover and failback always act on resource groups.
Resource dependency: A resource on which another resource depends. If resource A depends on resource B, then B is a dependency of A.
Network name resource: A logical server name that is managed as a cluster resource. A network name resource must be used with an IP address resource.
Preferred owner: A node on which a resource group prefers to run. Each resource group is associated with a list of preferred owners sorted in order of preference. During automatic failover, the resource group is moved to the next preferred node in the preferred owner list.
Possible owner: A secondary node on which a resource can run. Each resource group is associated with a list of possible owners. Resource groups can fail over only to nodes that are listed as possible owners.
Quorum mode: The quorum configuration in a failover cluster that determines the number of node failures that the cluster can sustain.
Forced quorum: The process to start the cluster even though only a minority of the elements that are required for quorum are in communication.
Hardware and Software Requirements
The following are the hardware and software requirements for installing the SQL failover cluster.
● A fault tolerant domain controller (each controller installed on a separate physical machine)
● For the cluster servers:
§ 2 Windows 2012 R2 servers each hosted on a separate physical machine
§ At least 50GB of storage per server
§ Each server should belong to a separate subnet and have additional IPs defined for the network controller
§ .Net 3.5 installed on each server
● A single SQL 2014/2016 Standard Edition installer and license
● A fault tolerant shared/SAN/NAS storage (min. size 50GB, recommended size 1TB)
Installation Checklist
The following is a checklist of the procedures that need to be taken in order to create the Windows and SQL cluster.
Domain Controller (DC) and Windows Cluster Configuration:
● Define the DC instance, if you don’t have one.
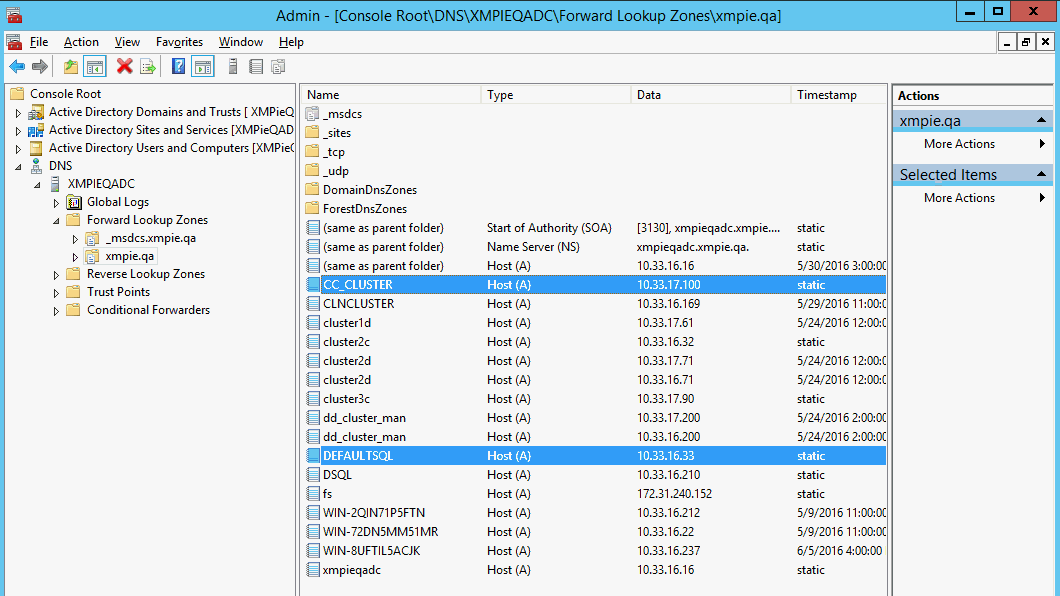
● Designate computer names with DNS.
● Create a domain user with domain controller permissions to update the DNS of these names.
● Define the Windows cluster name and IP as follows: CC_CLUSTER (or choose your own name) – for example 10.33.16.100
● Define the SQL cluster virtual name and IP as follows: DEFAULTSQL (or choose your own name) – for example 10.33.16.101
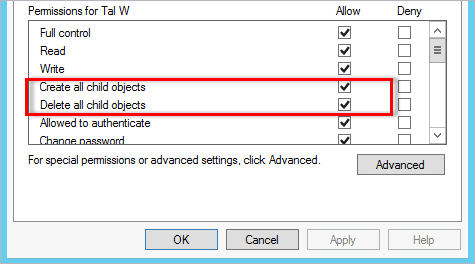
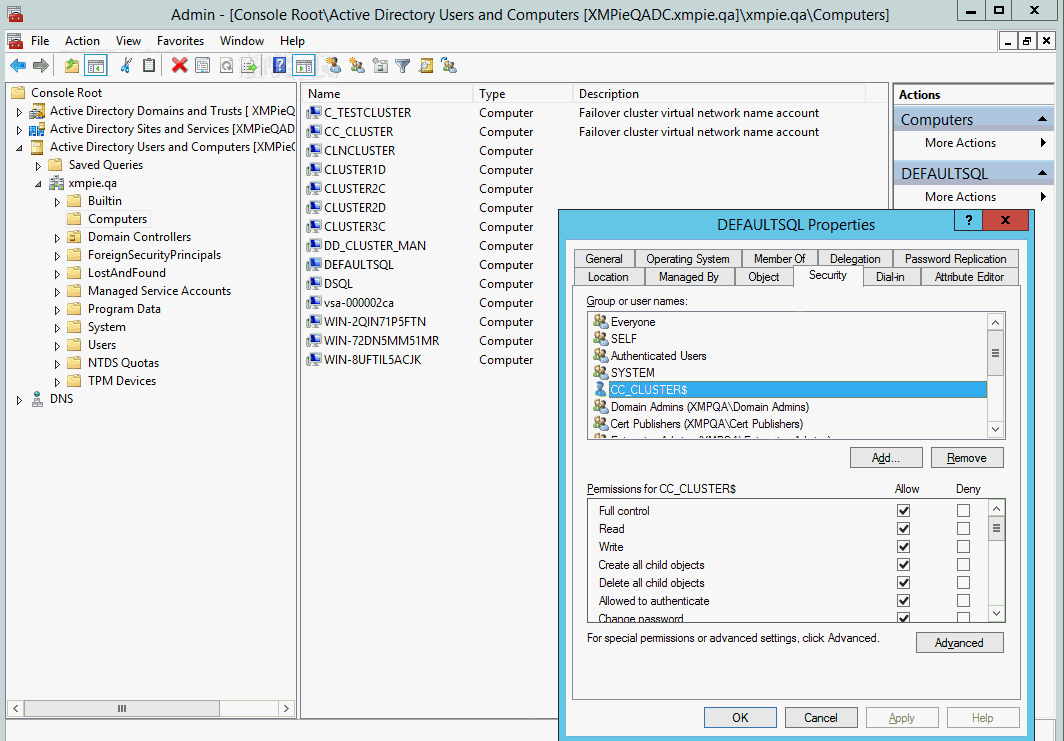
● Grant CC_CLUSTER full permissions on DEFAULTSQL using advanced properties (ALT+M).
● If using file share and a quorum witness file on the DC, create two shares on the DC with permissions to the SQL domain user.
Cluster nodes:
● Define the Windows cluster. Set the cluster IP, for example: 10.33.16.100
● In the cluster, set the File Share Witness file to be directed at the shared FS.
● Perform custom verification of cluster omitting storage.
● After verification succeeds, run the SQL failover installation.
● Use a domain user for installing and for running the SQL server (this is necessary to access file/folder shares and change the IP in the DNS).
● Set up temp folders to the local server; all other locations should point to shared storage.
● Upon first server installation, test the connectivity to the DB.
● Install an additional SQL server on an additional node/server, with an added node to the failover cluster option.
● Provide passwords where needed.
● Test the connectivity.
SQL Failover Architecture
The following is the layout of the SQL failover architecture. In this layout one SQL Server is active while the other is inactive (passive).

Installing Windows Cluster
Prerequisites
1. Create a domain user for creating the Windows cluster and installing the SQL.
This user needs to have permissions to create and delete child objects.
2. In the Active Directory Users and Computers, assign computer names and IPs to the Windows cluster and the SQL virtual cluster.
3. In the Active Directory Users and Computers, grant the Windows cluster computer full control over the SQL virtual cluster computer.
Installing the Failover Clustering Feature
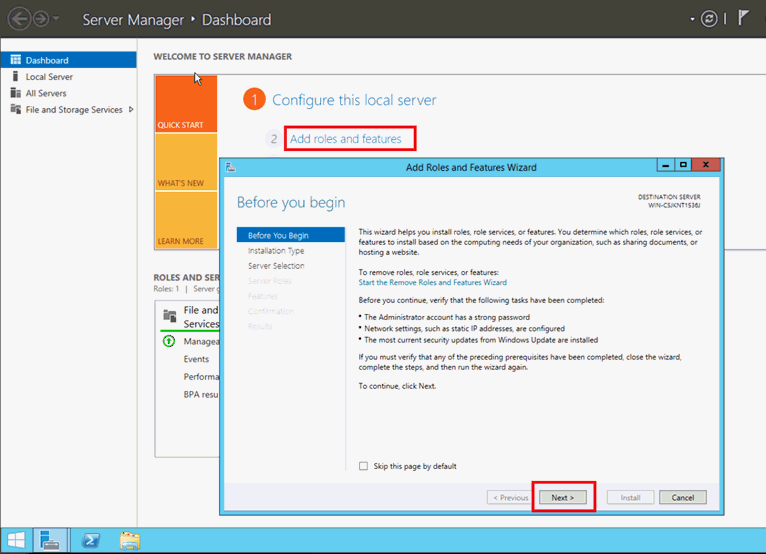
Being a node of a cluster, the server should first have the Failover Clustering feature installed.
1. In the Server Manager > Dashboard, click Add roles and features and then click Next.
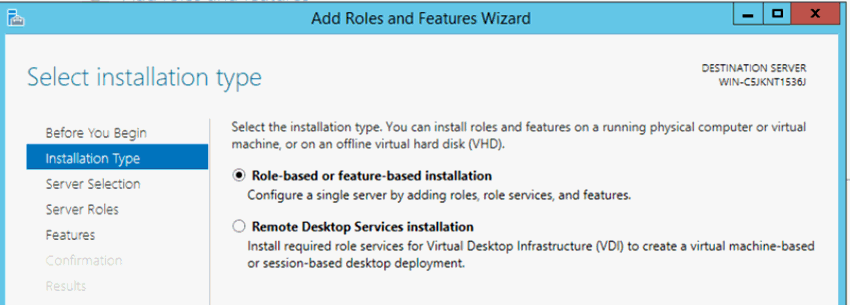
2. In the Installation Type step, choose Role-based or feature-based installation, and the click Next.
3. In the Server Selection step, click Next.
4. In the Server Roles step, click Next.
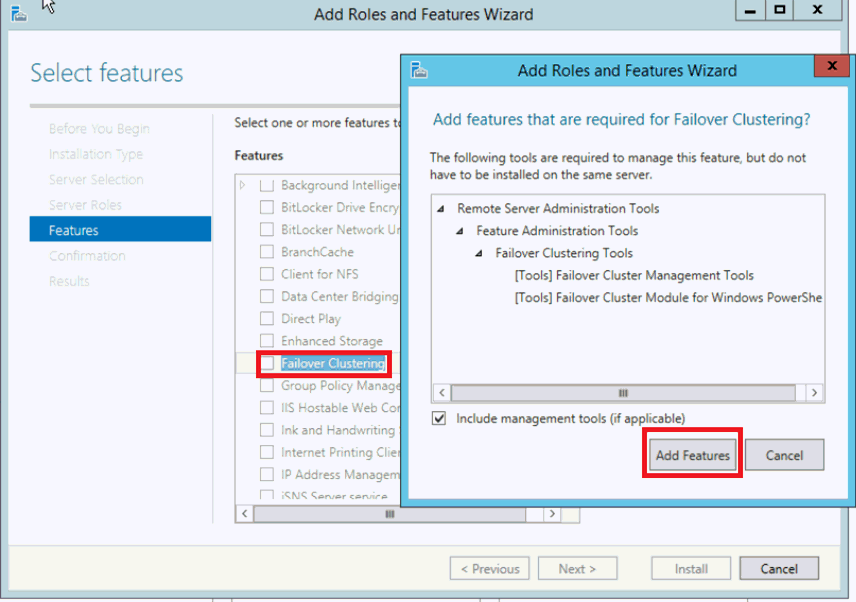
5. In the Features step, select Failover Clustering and then click Add Features.
6. Click Next, and then Install. Click Close when the installation is done.
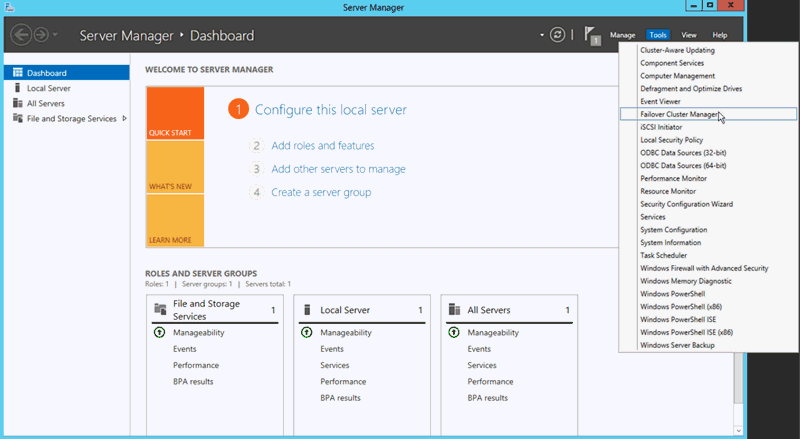
7. After adding the failover cluster feature, navigate to the Server Manager Tools and select Failover Manager.
Installing the Failover Cluster
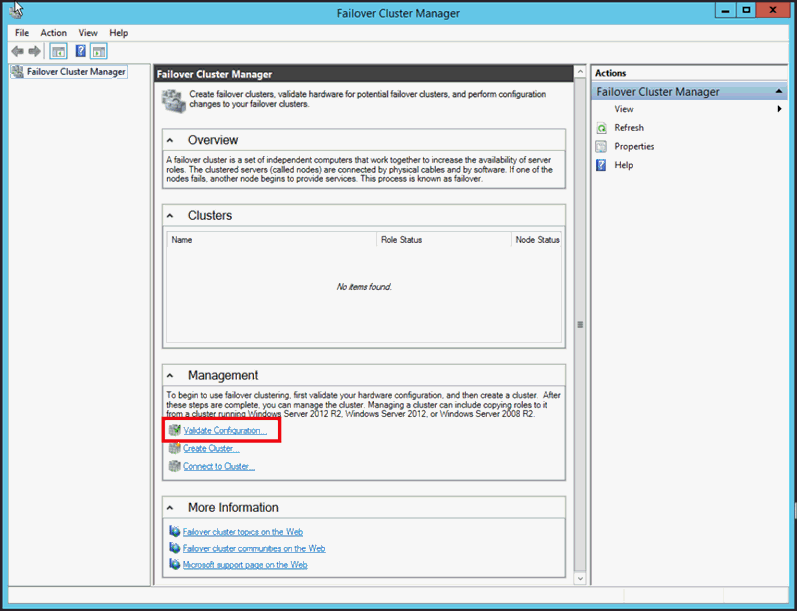
1. In the Server Manager, click Tools and then select Failover Cluster Manager.
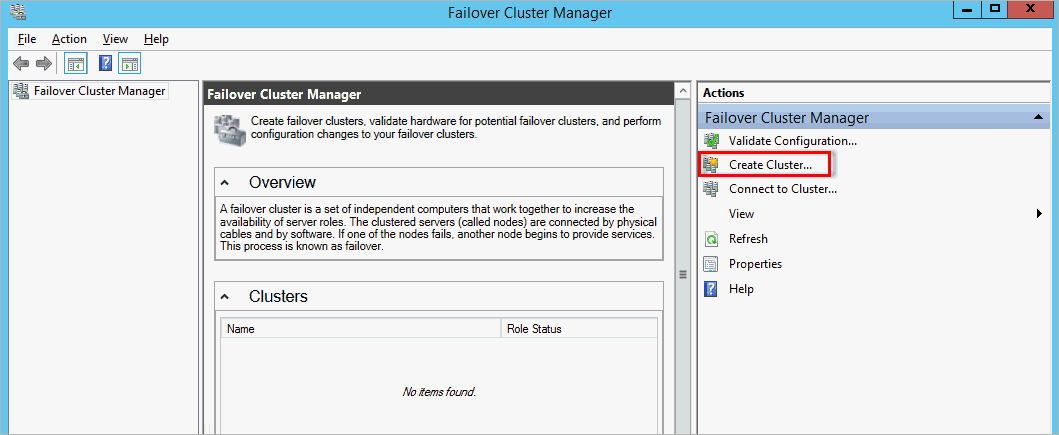
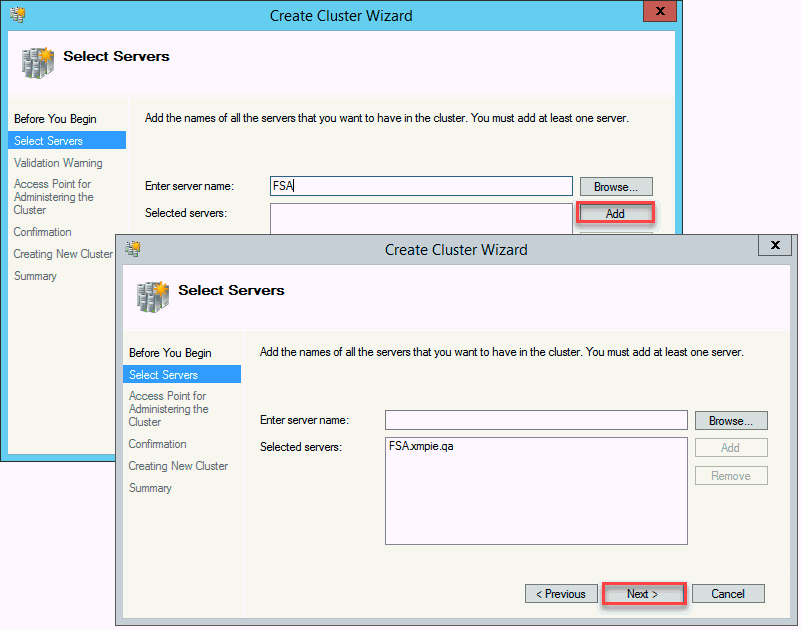
2. Select Create Cluster to create a cluster with new instances.
3. In the Select Servers step, click Add and browse the computer names to add instances to the list of clusters. Click Next.

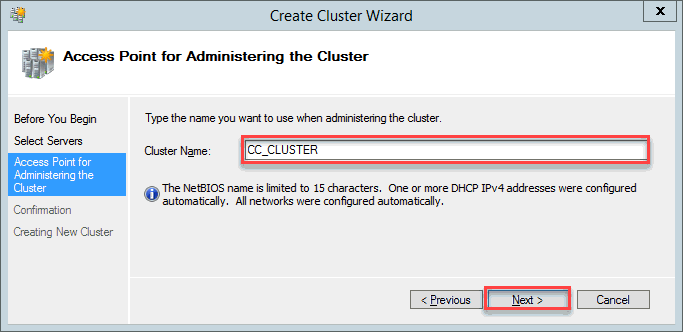
4. In the Access Point for Administering the Cluster step, fill in the cluster name. Click Next.
5. In the Confirmation step, click Next.

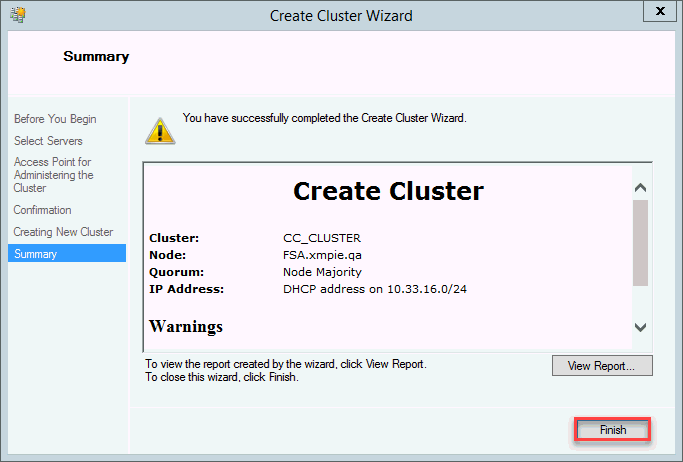
6. Congratulations! You’ve just created your cluster.
You can click View Report to check any warning that may have occurred during the cluster creation. Click Finish.
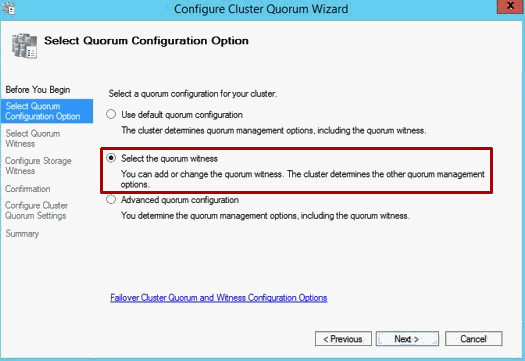
7. Now that the cluster is created, click it’s name in the Failover Cluster Manager. Launch the Quorum Wizard by right-clicking the cluster name, and selecting More Actions > Configure Cluster Quorum Settings.

8. In the Select Quorum Configuration step, choose the Select the quorum witness option. Click Next.
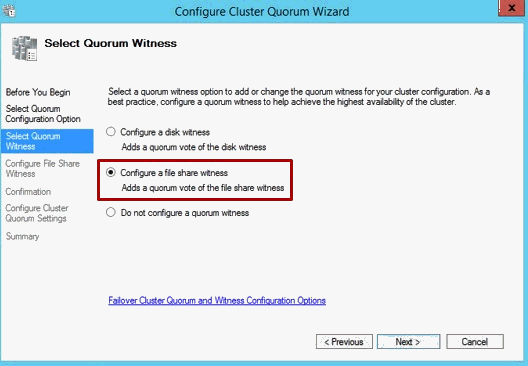
9. In the Select Quorum Witness step, choose Configure a file share witness. Click Next.

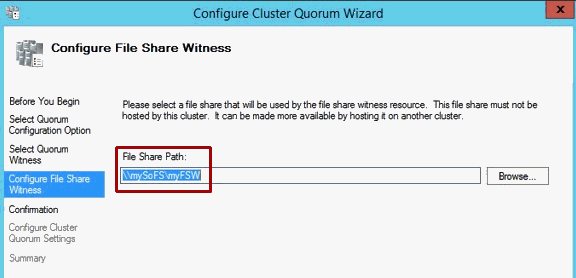
10. In the Configure File Share Witness step, specify the path to the File Share on your Scale-Out File Server, and click Next.
11. Validate the failover clustering by clicking Validate Configuration.
The Validate a Configuration wizard opens. Click Next.
12. In the Select Servers or a Cluster step, enter the name of the cluster.

13. In the Testing Options step, select Run only tests I select, and click Next.
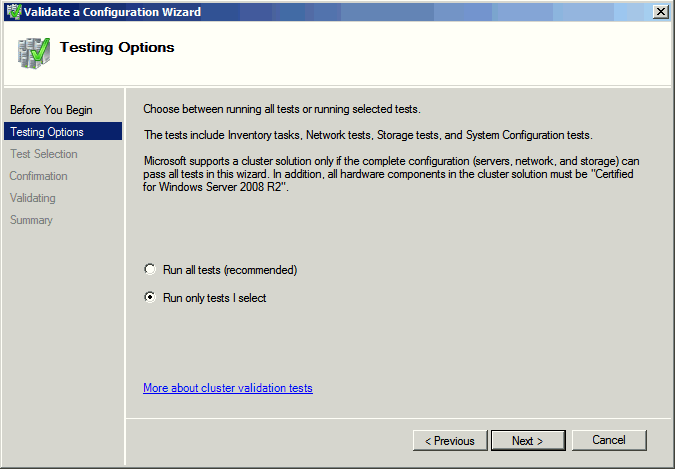
14. In the Test Selection step, clear the Storage checkbox and then click Next.

15. In the following steps, confirm the validation and ensure that the report is fine.
SQL 2014 Standard: SQL Server Failover Cluster Installation
Prerequisites
In order to install SQL, you will need to add the .NET 3.5 feature using the Server Manager. Simply select Add roles and features, skip through the roles and in the Features step select .NET 3.5.
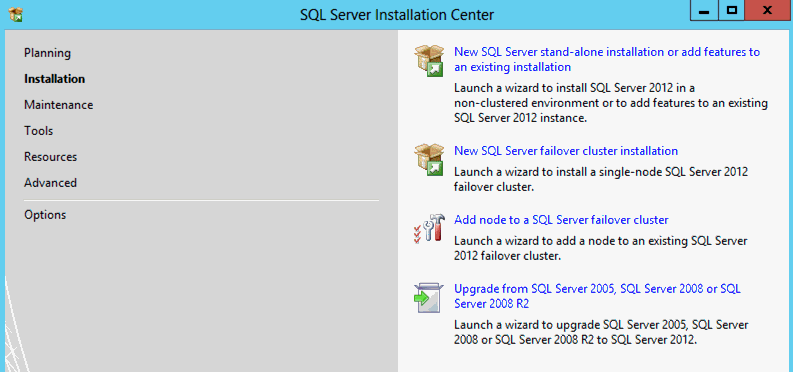
Installation
Mount the SQL image and run setup.
1. Start your SQL 2014 Server installation media and select Installation.
2. Select New SQL Server failover cluster installation.
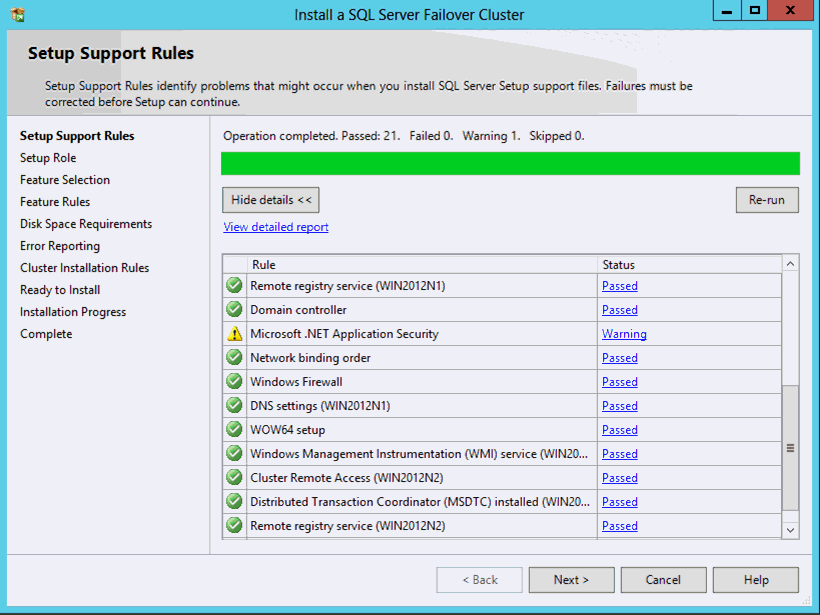
3. In the Setup Support Rules step, click Ok.

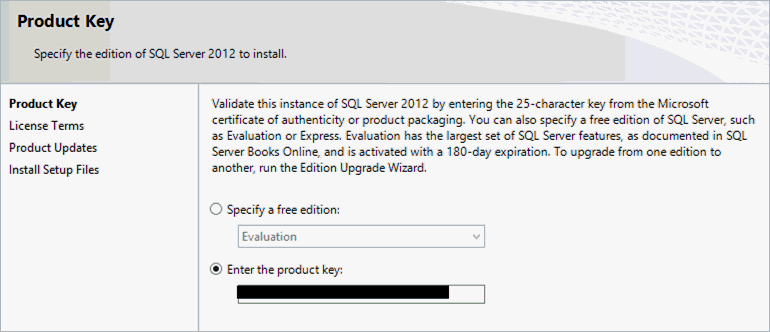
4. In the Product Key step, provide the product key for your media.
5. In the License Terms step, accept the license agreement, and then click Next.
6. In the Product Updates step, click Next (if you are not connected to the internet or do not want to perform Windows update, simply click Next to continue).

7. In the Setup Support Rules step, wait for the check to complete. Ensure there are no failed tasks. Evaluate the warnings for your environment, and correct if needed. Click Next
8. In the Setup Role step, ensure that SQL Server Feature Installation is selected, and click Next.

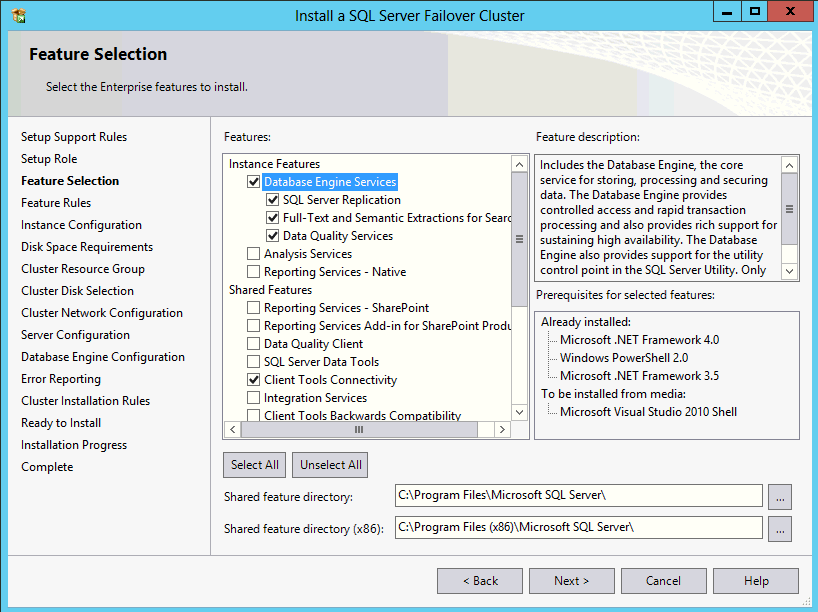
9. In the Feature Selection step, select your required SQL features and then click Next.
10. In the Feature Rules step, ensure the feature rule check is complete with no failed statuses. Click Next.

11. In the Instance Configuration step, provide network and instance names. The SQL cluster name is DEFAULTSQL. This name will be used as the SQL server name in XMPie installations. The database instance name is XMPie (or another name of your choice). MS recommends the use of named instances. Click Next.

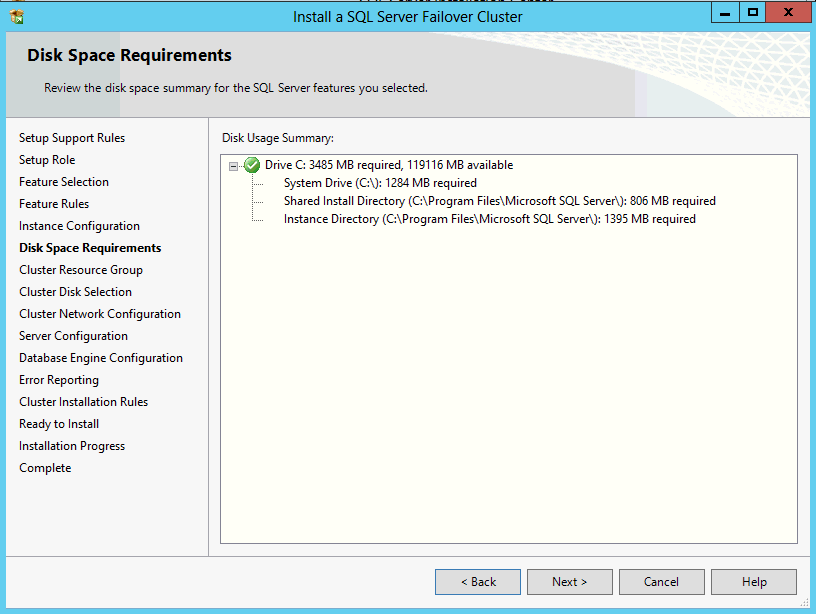
12. In the Disk Space Requirements step, click Next.
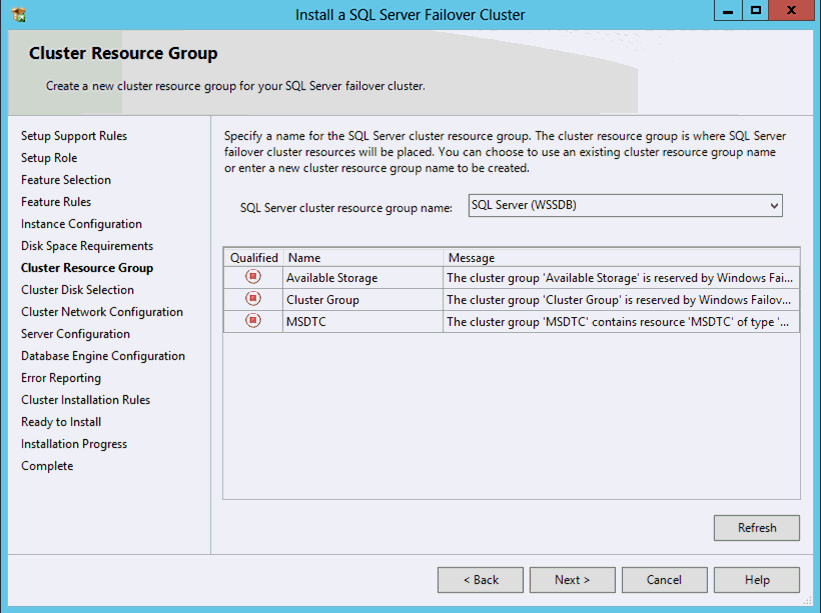
13. In the Cluster Resource Group step, click Next.
14. In the Cluster Disk Selection step, ensure no selection is made since an external file server is being used. Click Next.
15. In the Cluster Network Configuration step, enable IPv4 and provide an IP address for this node.
Define the two secondary IPs that were defined for the instances. Note that the IPs in the screenshot are for example purposes only. Click Next.

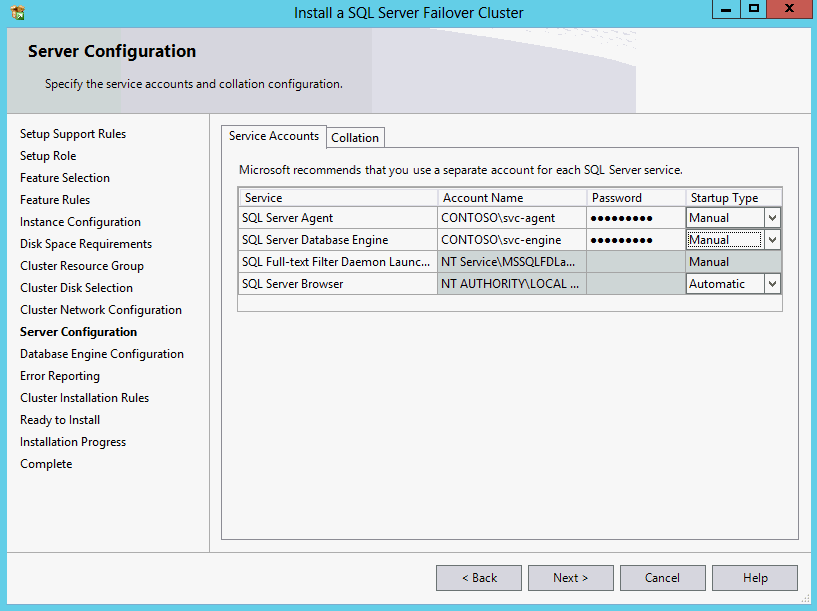
16. MS recommends that you use unique service accounts for each data service. In the Server Configuration step, provide service accounts (and Collation, if it differs from the default SQL_Latin1_General_CP1_Cl_AS).
The account name users should be domain users with elevated permissions that will grant read/write access to the shared storage/SAN/NAS.
Click Next.
17. In the Database Engine Configuration, click the Add Current User button, and then click the Data Directories tab.

18. In the Data Directories tab, define a shared data root directory. You can map a drive letter to the clustered disk for SQL instance content. Consider having different disks for data, log and temp data.
For tempDB, use local storage.
Click Next.

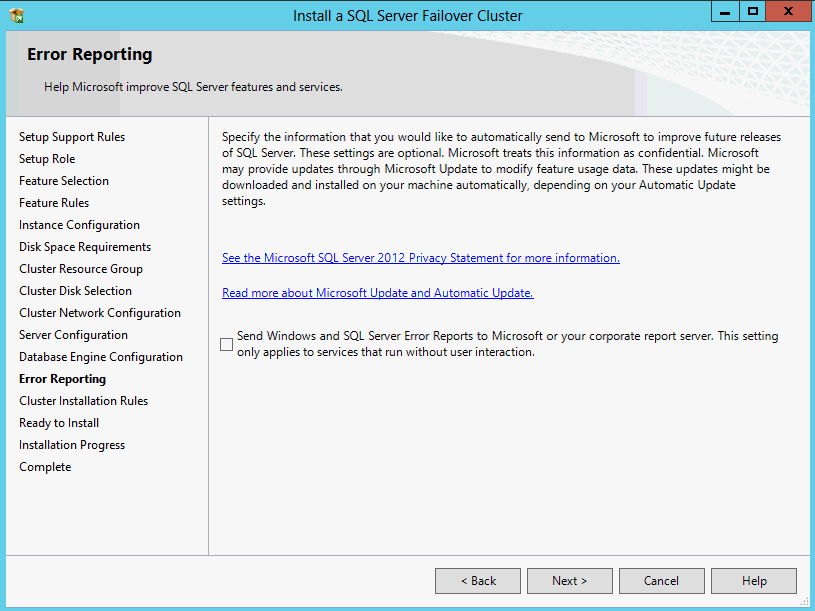
19. In the Error Reporting step, you can check the sharing error reports with MS. Click Next.
20. In the Cluster Installation Rules step, ensure there is no failure of cluster rules. Click Next.

21. In the Ready to Install step, confirm the selection. This is your final chance to make any changes before the installation. Click Install.
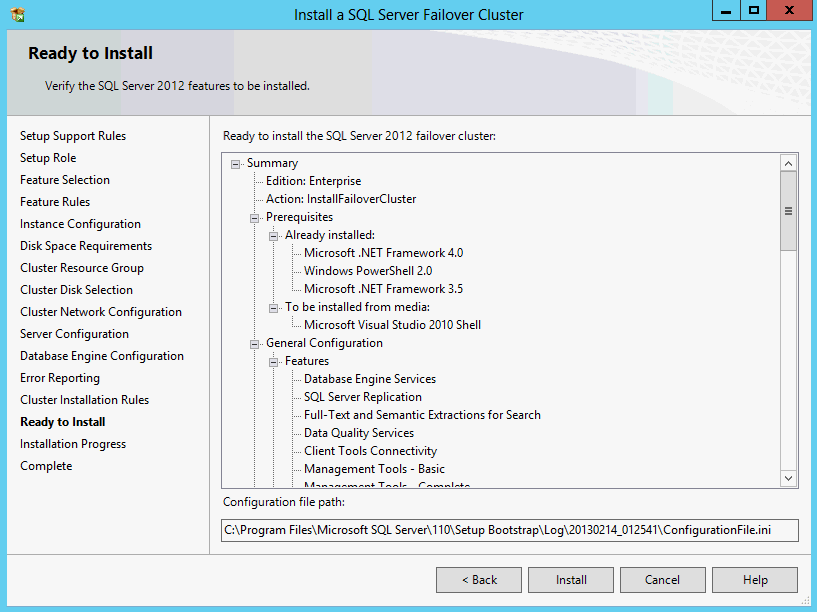
22. Upon a successful installation, click Close to complete the process.
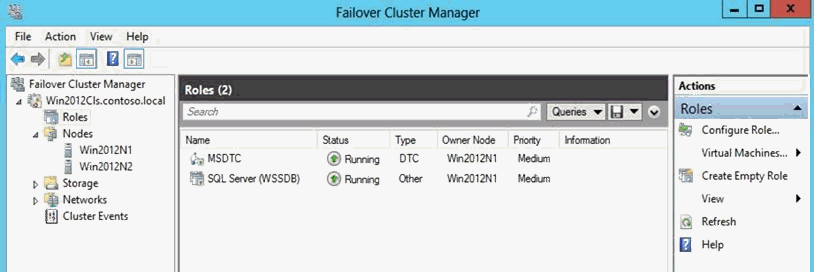
In the Failover Cluster Manager, this will be reflected in the cluster roles.
23. To verify successful configuration, open the SQL Server Management Studio and check connectivity to database.
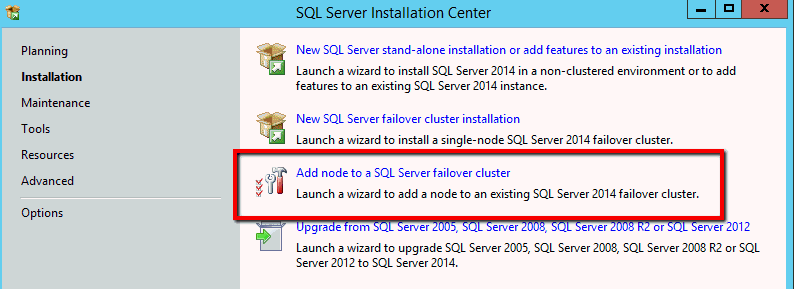
Installing SQL on an Additional Node
1. Mount the SQL image and run setup.
2. Start your SQL 2014 Server installation media and select Installation.
3. Click Add node to an SQL Server failover cluster.
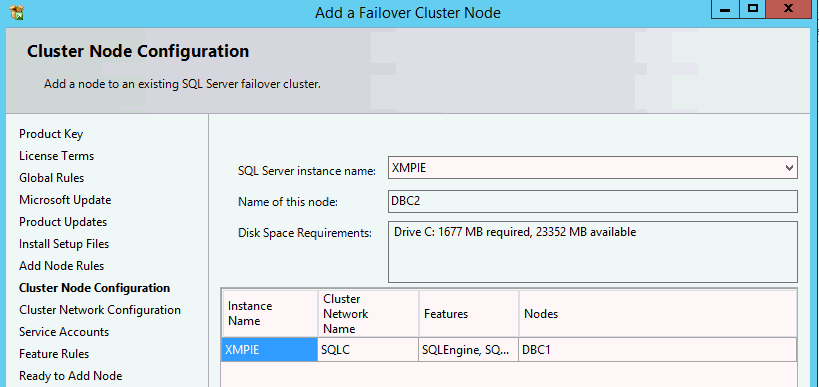
4. In the Cluster Node Configuration step, click Next.
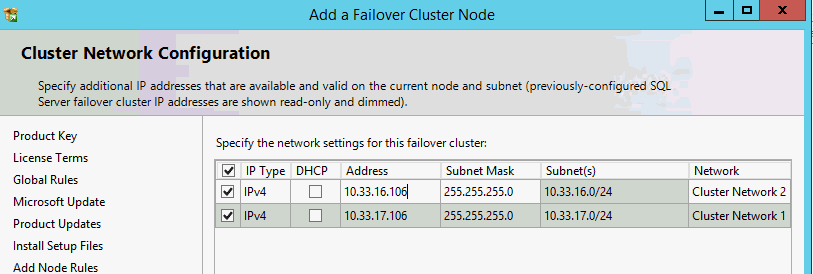
5. In the Cluster Network Configuration step, select two IPs from different network cards. Note that the IPs in the screenshot are for example purposes only. Click Next.
6. Upon receipt of the Add a Failover Cluster Node message, click Yes.

7. In the Service Accounts step, enter the passwords. Click Next.

 If TempDB was defined on a local server, manually create a duplicate folder under the same path as was defined in the cluster SQL installation (see step 18 above for first SQL server installation).
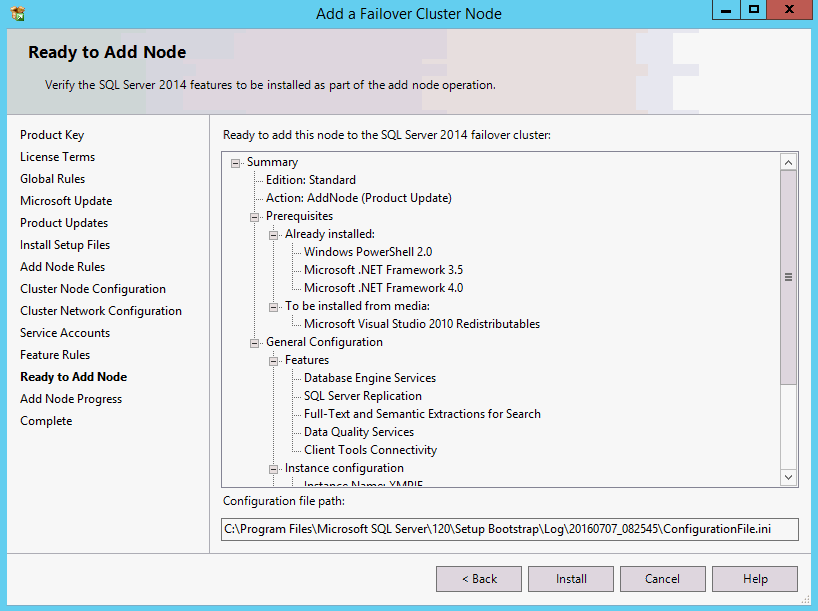
8. In the Ready to Add Node step, click Install.
9. To verify a successful configuration:
· Switch the Windows cluster to the installed node.
· Open the SQL Server Management Studio and check connectivity to database.
![]() It is important to stress that the secondary server used for failover support does not need to be separately licensed for SQL Server.
It is important to stress that the secondary server used for failover support does not need to be separately licensed for SQL Server.