After installing and configuring Certification Authority (CA) server, Next step is use it to generate SSL certificate for LDAPS configuration on Domain Controller.
The Lightweight Directory Access Protocol (LDAP) is used to read from and write to Active Directory. By default, LDAP traffic is transmitted unsecured. You can make LDAP traffic confidential and secure by using Secure Sockets Layer (SSL) / Transport Layer Security (TLS) technology. You can enable LDAP over SSL (LDAPS) by installing a properly formatted certificate from either a Microsoft certification authority (CA) or a non-Microsoft CA according to the guidelines in this article.
This will help to install certificates, which are digital credentials used to connect to wireless networks, protect content, establish identity, and do other security-related tasks.
To enable LDAPS, you must install a certificate that meets the following requirements:
- A private key that matches the certificate is present in the Local Computer’s store and is correctly associated with the certificate. The private key must not have strong private key protection enabled.
- The LDAPS certificate is located in the Local Computer’s Personal certificate store (programmatically known as the computer’s MY certificate store).
- The Active Directory fully qualified domain name of the domain controller (for example, ad001.vcloud-lab.com) must appear in one of the following places:
- DNS entry in the Subject Alternative Name extension.
- The Common Name (CN) in the Subject field.
- The Enhanced Key Usage extension includes the Server Authentication (1.3.6.1.5.5.7.3.1) object identifier (also known as OID).
- The certificate was issued by a CA that the domain controller and the LDAPS clients trust. Trust is established by configuring the clients and the server to trust the root CA to which the issuing CA chains.
- You must use the Schannel cryptographic service provider (CSP) to generate the key.
Part 1: Install and configure certificate authority (CA) on Microsoft Windows server with Group Policy
Part 2: Configuring Secure LDAPs on Domain Controller
ldp.exe LDAPS Cannot open connection Error 81
Part 3: Install and Configure Active Directory Federation Service (ADFS)
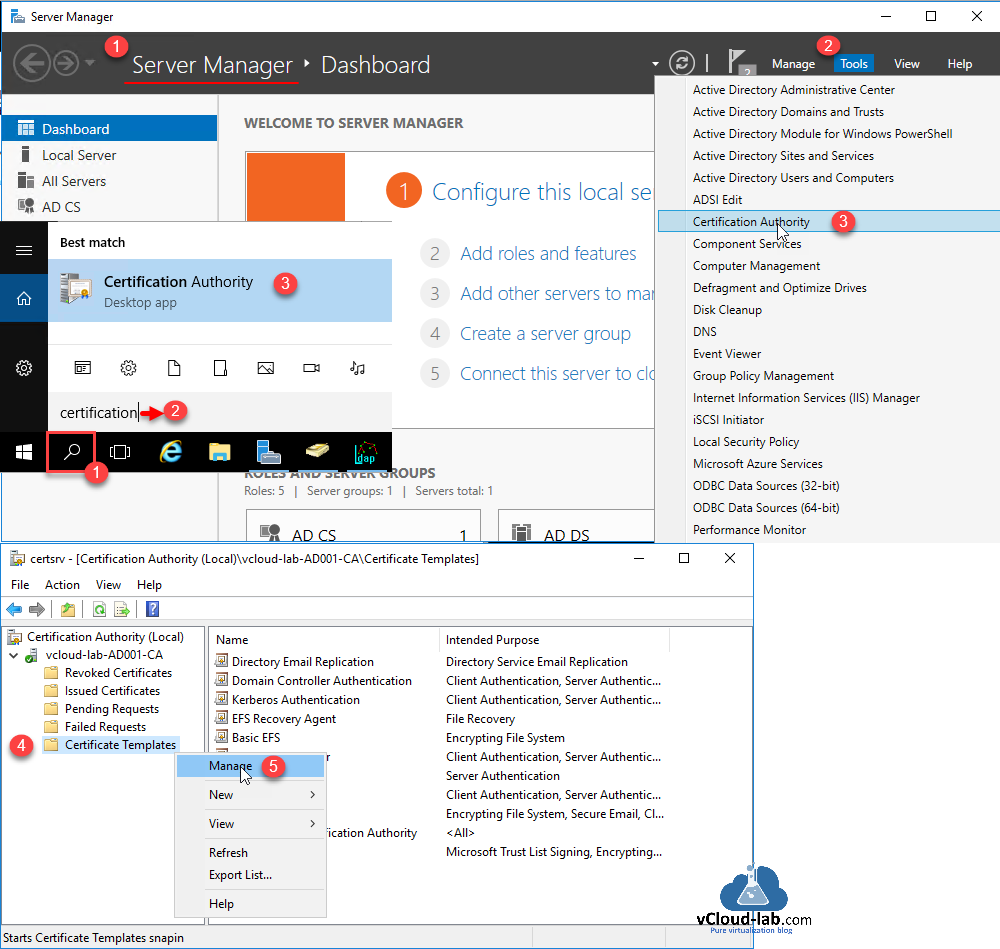
My CA server is hosted on AD server for lab purpose as there are resource constraints in the lab, so properly design your Active directory and Certification Authority server infrastructure. To go ahead, I logged onto Windows server (Already Domain Controller with Certification Services installed), Open either Server Manager >> Tools >> Certification Authority or Search for Certification Authority. This opens certsrv mmc management console. Here expand CA server and right click on Certificate Template. Click Manage from the context menu.
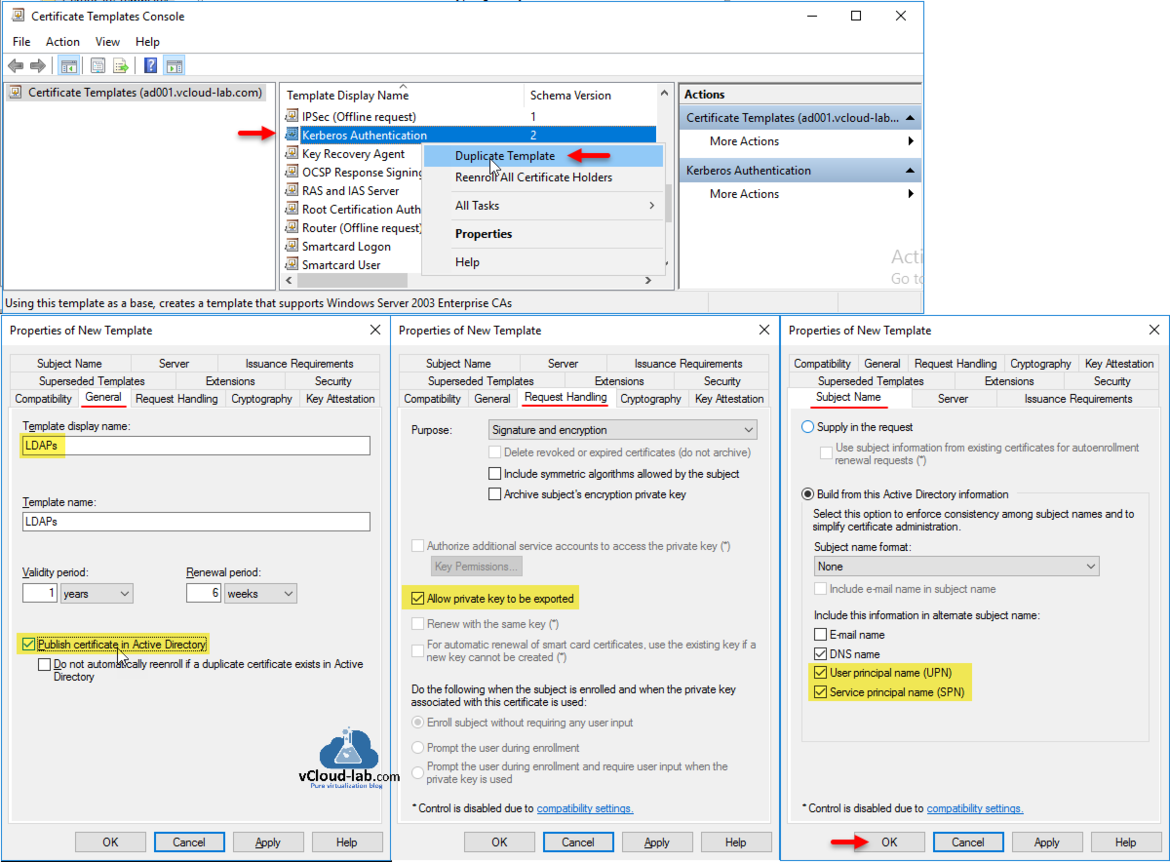
This opens another Management Console for Certificate Templates separately in another window. Find Kerberos Authentication from Template Display Name list and right click on it. Choose Duplicate Template from context menu. On the New Template Properties on General tab provide Template display name LDAPs and choose Publish certificate in Active Directory. Go to Request Handling tab and choose Allow private key to be exported. Next in the Subject Name, choose both User principal name (UPN) and Service principal name (SPN) and click OK.
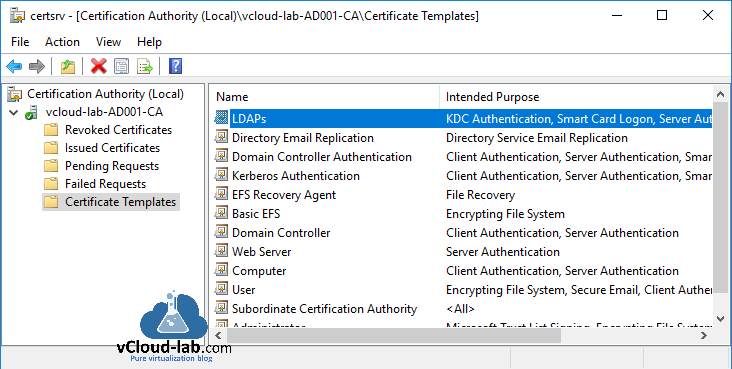
This newly generated copy of Kerberos Authentication certificate template will show as LDAPs in the templates list. Close Certificate Template Console.
After closing certificate template console, It will return to certsrv (Certification Authority) mmc console. On the Certificate Template right click and choose New >> Certificate Template to Issue. In the Enable Certificate Templates choose LDAPs name. and click OK.
Newly enabled certificate template will show on the list.
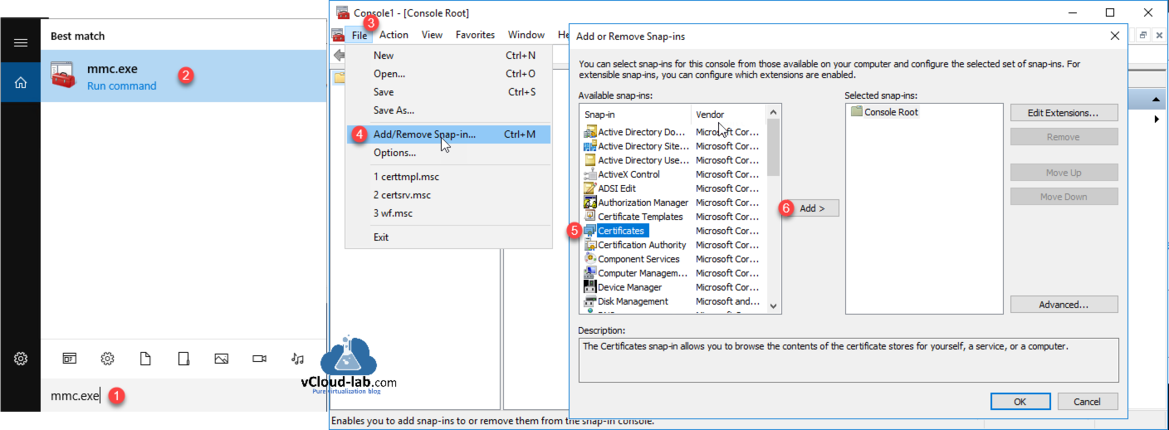
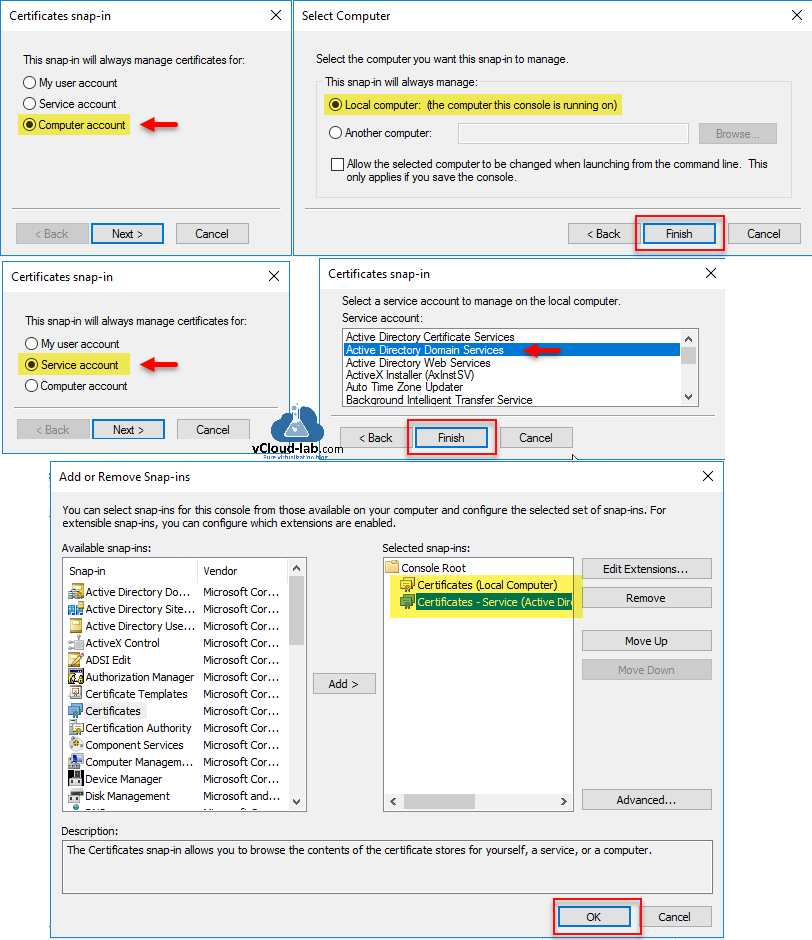
Certificate templates is configured, its time to use it. Now new SSL certificate need to be generated on Active Directory Domain Controller. Search and open mmc.exe, Go to File >> Add/Remove Snap-in then click Certificates and click Add. The certificates snap-in allows you to browse the contents of the certificate stores for yourself, a service, or a computer.
First select Computer account on Certificates snap-in and in the Select Computer keep default Local computer (the computer this console is running on) and press Finish. Repeat same process again click Certificates and click Add, but this time choose Service account and in the Select Computer keep default Local computer (the computer this console is running on), on the next select Active Directory Domain Services. In the last click Finish. Now under selected snap-ins you will see two certificates snap-ins, Click OK to proceed.
This will help to install certificates, which are digital credentials used to connect to wireless networks, protect content, establish identity, and do other security-related tasks.
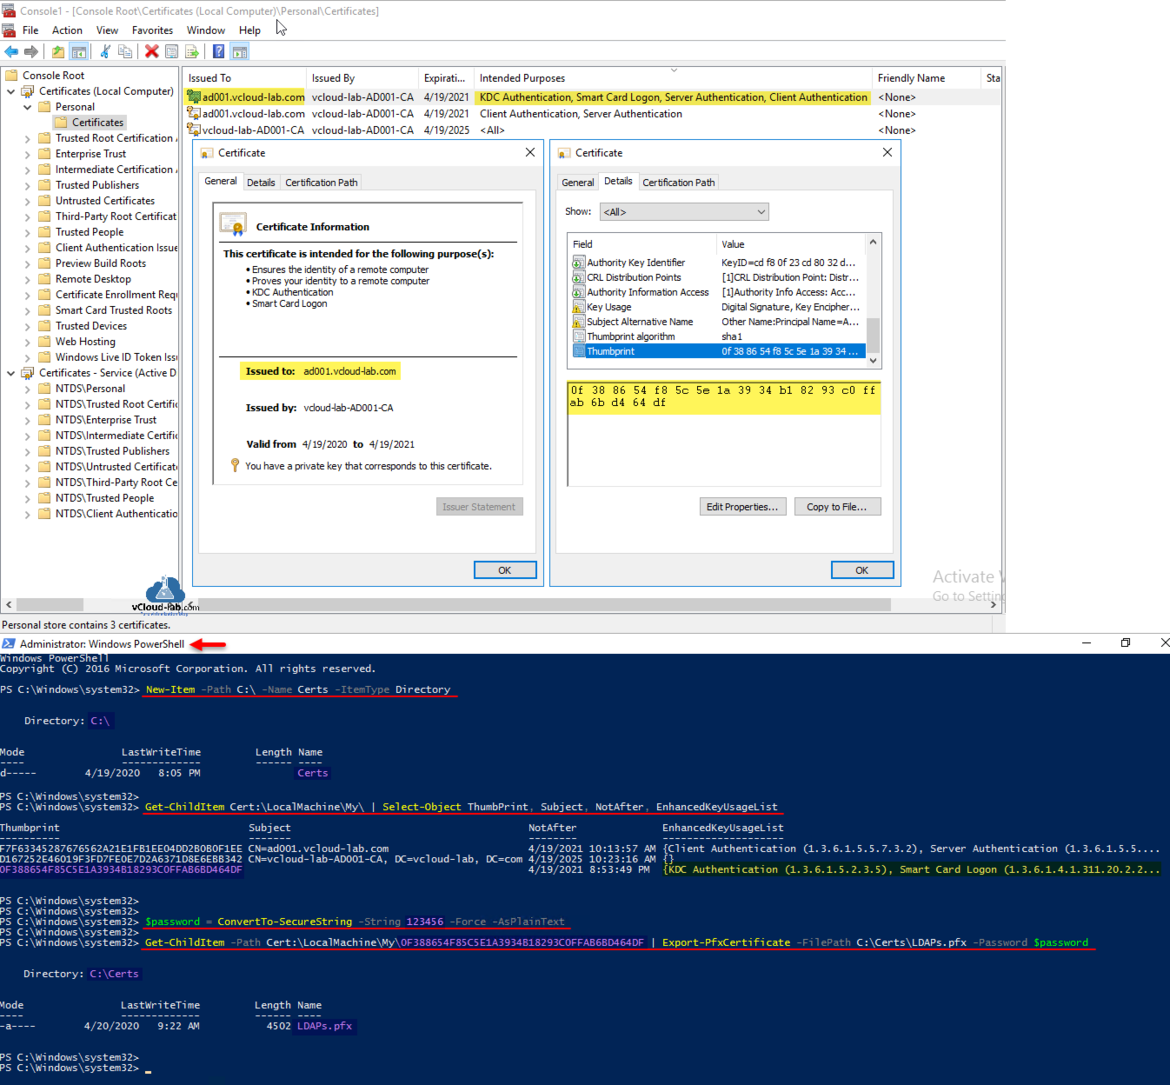
Next go to Certificates (Local Computer) mmc console – it is a LocalMachine certificate stores (Computer Account). Under Personal >> right click Certificates and choose All Tasks, then Request New Certificate. On the Certificate Enrollment Wizard, click Next on Before you Begin and Select Certificate Enrollment Policy, Request LDAPs certificate from list, the earlier created one by clicking check box. Check if Certificate Installation status is succeeded and press Finish (If it is failing restart Certificate Authority services and try again).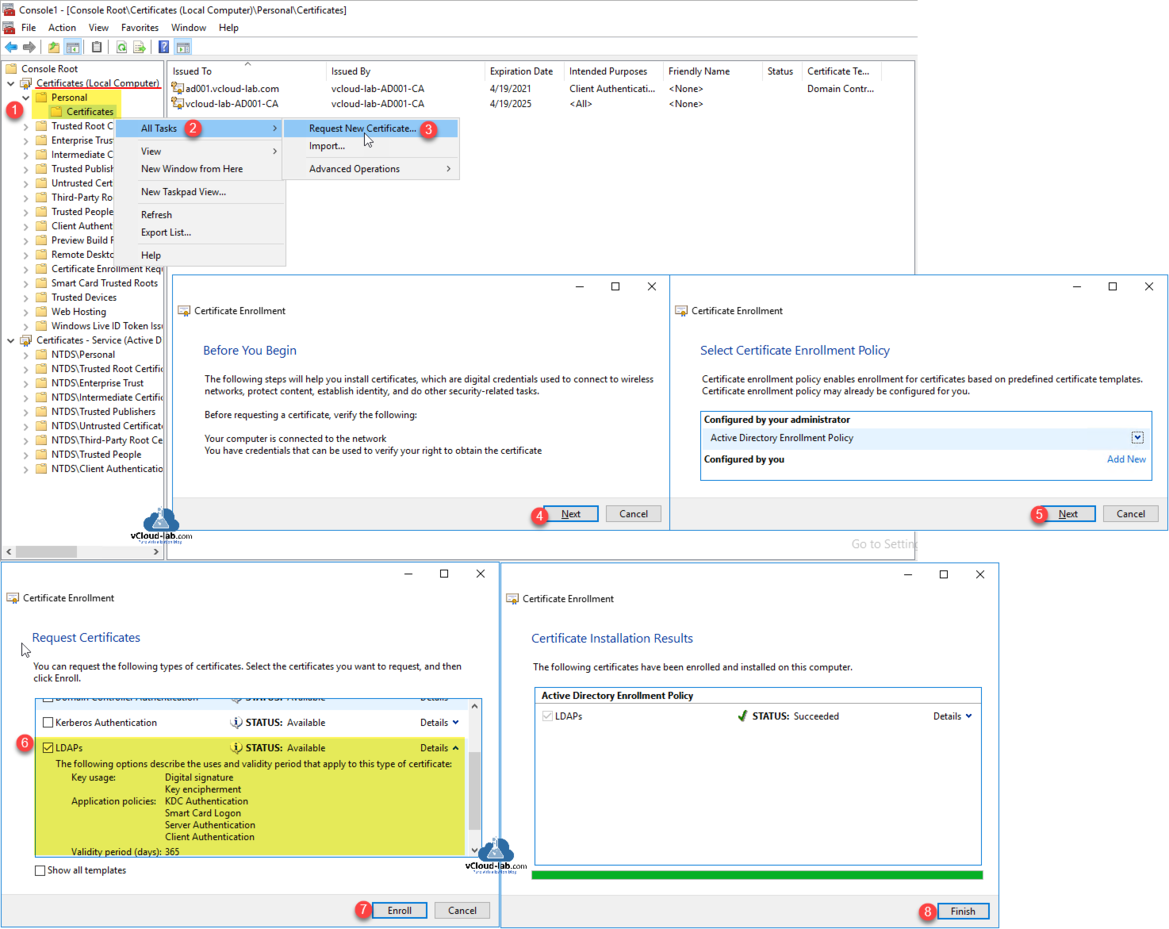
New certificate will be listed with Certificate Intended Purposes is KDC Authentication, Samrt Card Logon, Server Authentication, Client Authentication. and Issued to is FQDN of domain controller computer where this certificate was installed. Note down Thumbprint.
Create a new Folder with below command.
New-Item -Path C:\ -Name Certs -ItemType Directory
Next from the LocalMachine >> Personal certificates store list all the certificates specially with ThumbPrint. Match the thumbprint on the cert, and use it to export it as PFX certificate with password.
Get-ChildItem Cert:\LocalMachine\My\ | Select-Object ThumbPrint, Subject, NotAfter, EnhancedKeyUsageList

#Change Password and Certificate ThumbPrint accordingly.
$password = ConvertTo-SecureString -String "123456" -Force -AsPlainText
Get-ChildItem -Path Cert:\LocalMachine\My\0F388654F85C5E1A3934B18293C0FFAB6BD464DF | Export-PfxCertificate -FilePath C:\Certs\LDAPs.pfx -Password $password
My new certificate is generated unde path C:\Certs with name LDAPs.
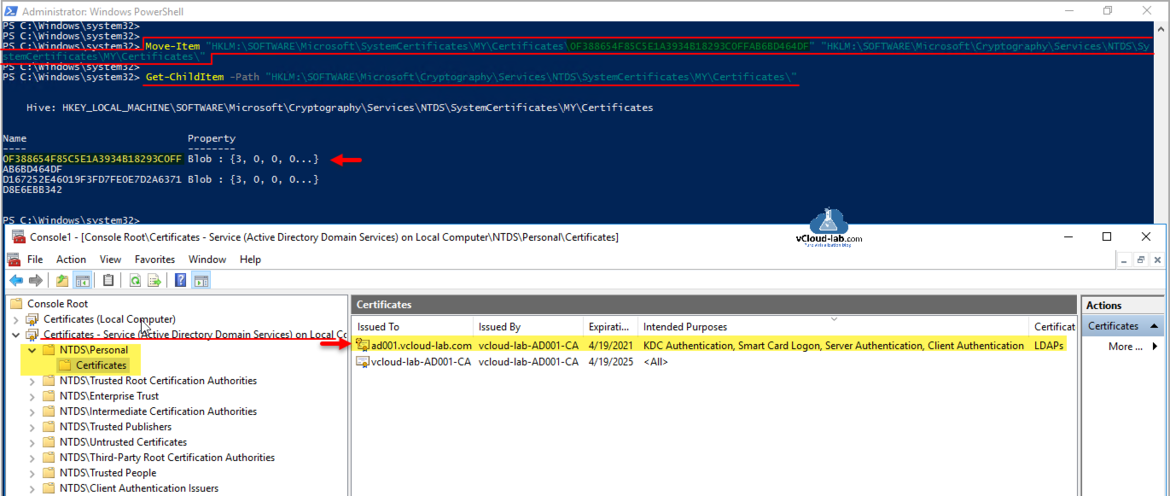
Next copy the certificate from LocalMachine Personal store to the Active Directory Domain Services Service Account Certificate store under NTDS\Personal Certificates, using below command.
#Change Certificate ThumbPrint accordingly.
Move-Item "HKLM:\SOFTWARE\Microsoft\SystemCertificates\MY\Certificates\0F388654F85C5E1A3934B18293C0FFAB6BD464DF" "HKLM:\SOFTWARE\Microsoft\Cryptography\Services\NTDS\SystemCertificates\MY\Certificates\"
Verify certificates in MMC console or on registry location HKLM:\SOFTWARE\Microsoft\Cryptography\Services\NTDS\SystemCertificates\MY\Certificates\ whether they are added successfully.
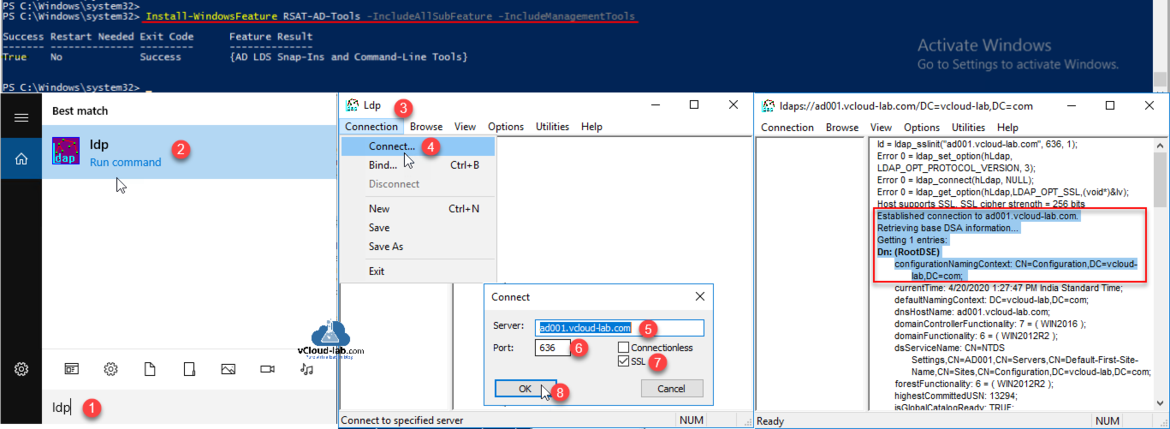
This is last step in the article, verify LDAPs is correctly setup/configured buy connecting it. For this we need ldp.exe tool, Make sure RSAT AD tools are installed before using it. (It is already installed on Active directory if AD tools are selected for installation)
Install-WindowsFeature RSAT-AD-Tools -IncludeAllSubFeature -IncludeManagementTools
Search for ldp and open it. On the Connection menu select connect choose server, make sure FQDN is selected, Port is 636 and SSL is checked, Click OK to proceed. Once succeeded It shows Established connection to selected domain controller.
