Cisco Unified Communications Manager Configuration
Create a SIP Profile
1. Log into your CUCM web console: https://x.x.x.x
2. From the menu select: Device –> Device settings –> SIP Profile
3. Click Add New
4. Provide a name and configure the SIP profile as per the screen shots below ensure that:
a. Early offer support for voice and video calls* is set to : Mandatory (insert MTP if needed)
5. Click Save
Create a SIP Security Profile
1. From the Menu Select: System -> Security -> SIP Trunk Security Profile
2. Click Add New
a. Provide a proper name
b. Ensure Incoming Port is set to 5060
c. Check the boxes for:
i. Accept out-of-dialog refer**
ii. Accept unsolicited notification
iii. Accept replaces header
Create a SIP Trunk
1. From the menu Select: Device –>Trunk
2. Click Add New
3. Trunk Configuration
a. Follow the screenshots below and ensure you have the below configured
i. Check: Media Termination Point Required
ii. UnCheck: PSTN Access
iii. Check: Redirecting Diversion Header Delivery – Inbound
iv. Check: Redirecting Diversion Header Delivery – Outbound
v. SIP Information:
4. Line 1 enter the IP Address of the Lync/Skype for Business Server X.X.X.X in the destination address field and port 5060
vi. Ensure you have select the appropriate calling search space to route the calls.
vii. Click Save
Create a SIP Route Pattern
1. From the menu Select: Call Routing -> SIP Route Pattern
2. Click Add New
3. Enter following information for your Lync/Skype for Business 2013 Server SIP Domain
a. Pattern Usage: Domain Routing
b. IPV4 Pattern: Your Lync SIP Domain (Contoso.com)
c. Route Partition: select the appropriate partition to route the call
d. SIP Trunk/Route List: Select Trunk-Lync/Skype for Business from the drop down list
4. Click Save
Create a Dialing Route Pattern
1. From the menu Select: Call Routing -> Route/Hunt -> Route Patterns
2. Click Add New
3. a. Enter the following information:
i. Route Pattern Definition
ii. Route Pattern: 7 digit number to be dialed eg 5552079
iii. Description: Give an appropriate description for this pattern
iv. Gateway/Route List: Trunk-Lync/Skype for Business
v. Uncheck: Provide outside dial tone
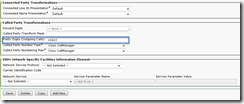
b. Called Party Transformations:
i. Prefix Digits (Outgoing Calls): +1613
4. Click Save
Create a Remote Destination Profile (RDP) for a User
1. From the menu Select: User Management -> End User
2. Find the user you would like to create an RDP for and click their name
3. Scroll down to Mobility Information and Select: Enable Mobility
4. From the menu Select: Device -> Device Settings-> Remote Destination Profile
5. Click Add New
a. Remote Destination Profile Information
i. Provide a name for the RDP i.e. HMankalRDP
ii. Userid: Hmankal (username of the user)
iii. Click Save
b. Associated Remote Destinations
i. Click Add New
ii. Remote Destination Information
1. Name URI on Lync/Skype for Business/Skype for Business
2. Destination Number: [email protected] or SIP URI for user on Lync/Skype for Business/Skype for Business
3. Check:
a. Enable Unified Mobility Features
b. Enable Single Number Reach
c. Enable Move to Mobile
iii. Timer Information
1. Wait : 0.0
2. Delay of : 1.5
3. Stop Ringing: 18
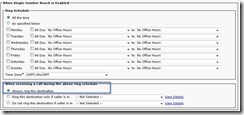
iv. When Single Number reach is enabled:
1. All the time
v. When receiving a call during the above ring schedule
1. Check: Always ring this Destination
vi. Click Save
6. From the menu Select: Device -> Device Settings-> Remote Destination Profile
a. Association: Click Line 1 Add a new DN in the upper left hand corner 
b. Directory Number: Enter the users 7 digit CUCM extension number
c. Click Save
Configure Lync/Skype for Business Server
Remote Desktop into your Lync/Skype for Business Server 2013 Server UCLync/Skype for BusinessFE.hoc-uc-cdc.ca
Modify the Lync/Skype for Business Server Topology
1. Open the Lync/Skype for Business topology builder and download/save the topology.
2. Expand Lync/Skype for Business Server
3. Expand HoC
4. Expand Lync/Skype for Business Server 2013
5. Expand Mediation Pools
a. Right click UCLync/Skype for BusinessFe.hoc-uc-cdc.ca. click Edit Properties
b. Check: Enable TCP Port
i. Change port to 5060
6. Expand Shared Components
7. Right Click PSTN gateways -> Click New IP/PSTN Gateway
b. Enter the IP Address for your CUCM X.X.X.X, click Next
c. Define the IP Address, Click Next
d. Define the root trunk
i. Trunk Name CUCM
ii. Listening Port for IP/PSTN Gateway: 5060
iii. SIP Transport Protocol: TCP
iv. Associated Mediation Server: UCLync/Skype for Business FE01.Constoso.com Associated Mediation Server Port: 5060
v. Click finish
8. From the top menu Select: Action -> Topology -> Publish
9. Follow the wizard until completed
Modify the Lync/Skype for Business User
1. Log into the Lync/Skype for Business 2013 server control panel
a. Click Users -> Search for the user you want to modify
b. Double Click the User you want to modify
c. Ensure the user is enabled for Enterprise voice
d. In the Line URI Field Ensure the users phone number is enter in this format
i. tel:+16135552072;ext=2322072;ms-skip-rnl
1. The reason we add the “;ms-skip-rnl” is to ensure that all calls dialed to this user are sent to their cisco phone and then be allowed to simul ring to Lync/Skype for Business.
e. Click Commit if any changes were made.
2. Ensure that you have the appropriate voice routing rules to normalize the 7 digit number to E.164 and route the call out the CUCM sip trunk to the call manager.
3. Have the user exit the Lync/Skype for Business Client and reopen it
4. Dial their extension from a secondary phone, you should see the new call ring on their Cisco Phone and Lync/Skype for Business Client.


