The Exchange Server 2013 release has brought a handful of innovations into admin’s inventory, among them we can find a new management console called Exchange Admin Center (EAC). It is there to replace its predecessor, Exchange Management Console (EMC), which supported admins in managing Exchange 2010 organizations. Both consoles are pretty distinctive, since EMC is a Microsoft Management Console (MMC) type application, and EAC is a web-based management console which is installed on Client Access Server (CAS) as a virtual directory on IIS. EAC is equipped with Exchange Control Panel (ECP), it is a non-restricted web application, accessible practically from every location in network (LAN, Internet). Anyone who has a valid username and password, may unprecedentedly log on to it. It may pose a great threat when CAS is installed in a perimeter network like DMZ and some hackers using intercepted passwords could be able to log on to ECP from the Internet.
Fortunately, Microsoft gives us a possibility to restrict access to ECP without turning off access to OWA. We can do this by just simply following the documentation from Technet and trying the command below:

Set-EcpVirtualDirectory -identity "ecp (Default Web Site)" -AdminEnabled $false
As it can be seen in the screenshot above, if we want the changes to take immediate effect we may execute the “iisreset /noforce” command.
iisreset /noforce
After the implementation of the solution, each attempt to reach ECP page will end with the “404 – page not found” error, or alternatively the request will be redirected to OWA options of administrator account details (see the screen below).
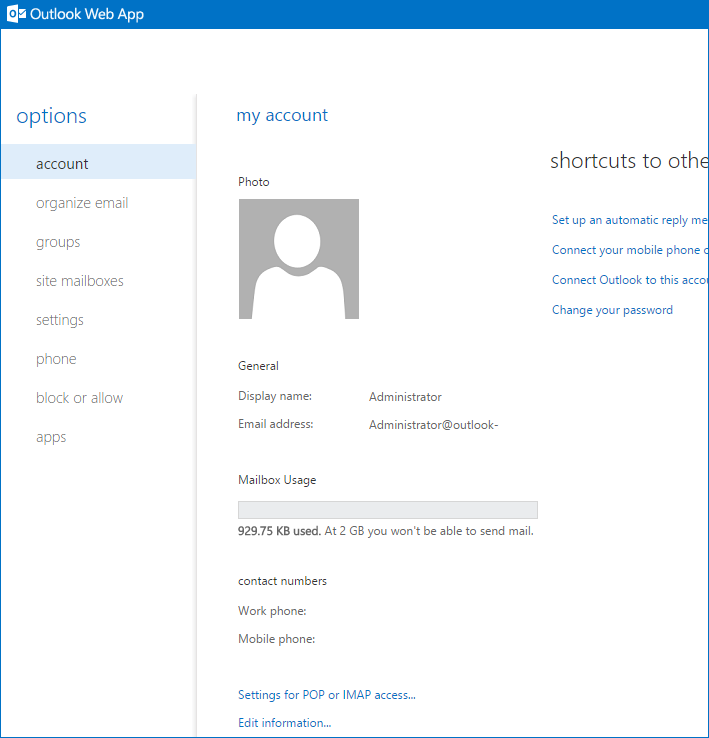
However, this solution has one drawback. Although by the implementation of this feature we successfully restrict access to ECP from the Internet zone, we lose access to ECP from the internal network. In this case Microsoft recommends us to install one more CAS server for internal ECP access only. But in my own and professional IT colleagues’ opinion, much better would be to install a second website with ECP and OWA virtual directories on the internet-faced CAS. This is a less expensive and time-consuming solution.
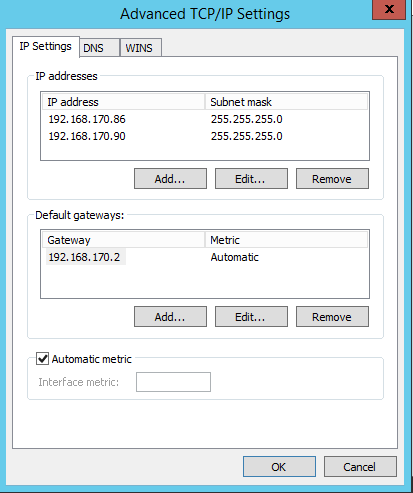
To apply the solution, we need to assign a second IP address to our server where CAS is installed on (most often the only one we have). It can be easily done by configuring a new IP address on the second network adapter installed in a CAS server, or by assigning a second IP address on the existing network interface. The first way is mainly deployed by administrators in case of the security policy compliance reasons, however, the second way is easier in terms of implementation and cheaper. The screen below illustrates the latter solution:
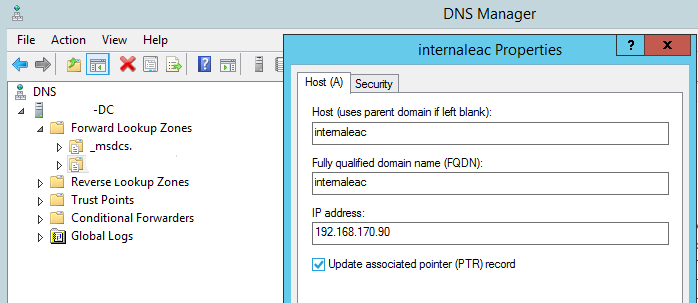
After the IP address arrangement to CAS, we need to create an appropriate record in the DNS zone on the DNS server. The name in this record will be used to reach out to the custom ECP virtual directory. What’s more, this record also needs to point to the IP address configured one step earlier:
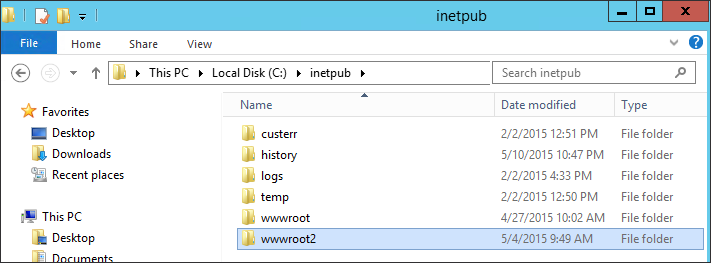
In the next step, we create a folder for the second website, e.g. wwwroot2, under C:\Inetpub folder.
When the folder is created, we have to open the Internet Information Services (IIS) Manager and establish the second website, e.g. “InternalEAC”, pointing to the created folder C:\inetpub\wwwroot2 and bound to TCP/80 (HTTP) and TCP/443 (HTTPS) ports. Screens below present the walkthrough process.
First of all, we have to remember to bind the new website with the new IP address:
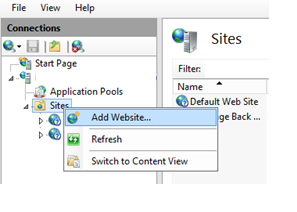
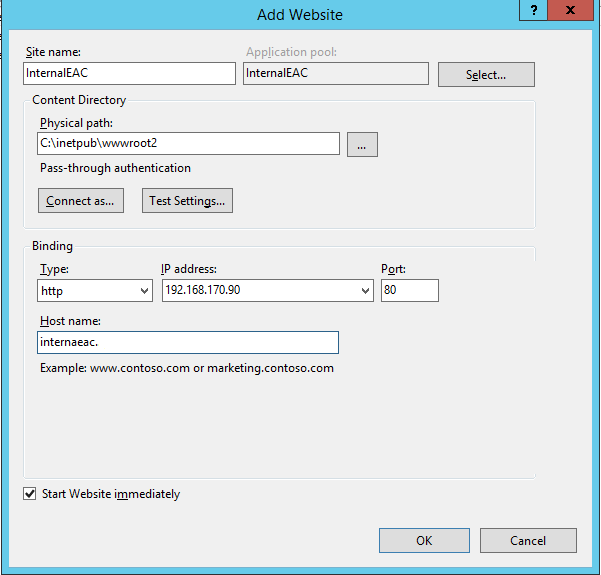
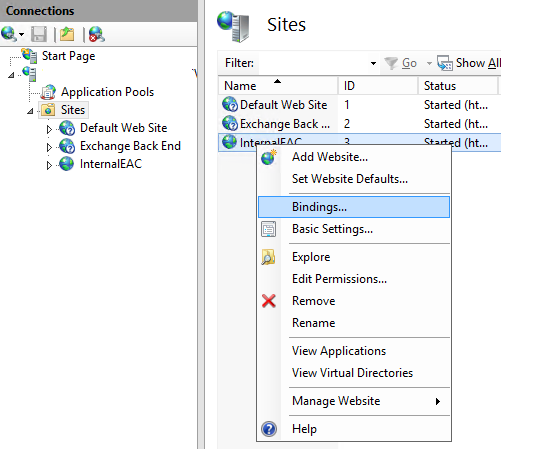
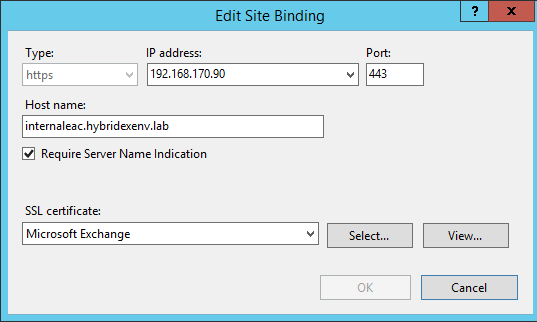
In the following step, we need to set up virtual directories for ECP and OWA under the newly created second website. We will approach this by executing the commands below:

New-EcpVirtualDirectory -Server "<ServerIdParameter>"-WebSiteName "InternalEAC" -InternalUrl "<internal url>"
New-OwaVirtualDirectory -Server "<ServerIdParameter>"-WebSiteName "InternalEAC" -InternalUrl "<internal url>"
After this point, we disable access to EAC using the Microsoft solution mentioned earlier. To do this, we simply run the following commands:

Set-EcpVirtualDirectory -identity "ecp <Default Web Site>" -AdminEnabled $false
iisreset /noforce
Finally, there are only two last steps to go. It is restricting access to the IP address bound to our custom website, e.g. for internal users or admin management stations. This will prevent access to our new website from undesired areas like perimeter networks or the Internet area.
The last step is to assign to the custom ECP website a proper certificate for SSL purposes. It can be a third-party certificate (e.g. an existing wildcard certificate assigned already to Default Web Site), a certificate from the internal CA or a self-signed certificate. In case of creating a new certificate, we have to remember about matching the name in a certificate with the name used in the ECP URL.