One of the benefits of Exchange hybrid configuration is that it allows for central management of both systems – your on-prem server and Office 365 Active Directory. With the Microsoft DirSync tool you can also propagate user information from your local environment up to the Cloud. Its another great feature is that it also allows to sync users’ passwords. Owing to this, they will have to remember only one password instead of two.
The following article explains how to set up password sync and how to filter out unnecessary data leaving only passwords.
DirSync deployment
The first step is to download DirSync from Microsoft’s site. The program requires a 64-bit environment, preferably a server machine within your domain, however it should not be a domain controller. Additionally make sure that there are .NET 3.5 SP1 and .NET 4.0 libraries installed on the machine.
Next, log into your Office 365 administrator account. Navigate to Users, Active Users, and click the Active Directory synchronization Setup link on top of the list. On the list that shows up, in point “3” click the Activate button. An Active Directory synchronization is activated message should be displayed, as shown on the below image:
 You can use the Download button in point “4” to download the DirSync tool.
Now you can launch the DirSync setup file. Follow the standard installation wizard until finish. Once the process is complete mark the Start Configuration Wizard now before clicking Finish.
Once the wizard launches provide the Office 365 administrative user’s credentials, then click Next:
In the following step enter the on-prem administrative credentials. Then hit the Next button until you arrive at Password Synchronization (the Hybrid Deployment step is not relevant in this scenario – leave it unchanged). Mark the Enable Password Sync checkbox, then click Next.
The final step is to uncheck the Synchronize your directories now box, as there are a couple of other options we need to set before syncing. Click Finish to close the wizard.
Filtering out AD attributes
Since, in our example, we want to sync only passwords and leave other user attributes in the Cloud unchanged, we need to filter out these AD attributes from the syncing task. To do so, launch the Synchronization Service Manager console by navigating to the following path:
C:\Program Files\Windows Azure Active Directory Sync\SYNCBUS\Synchronization Service\UIShell
and running the miisclient.exe program. Once it is launched, click the Management Agents tab.
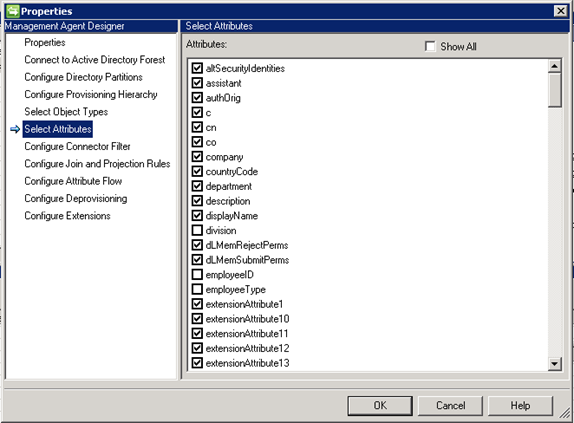
Right-click the Active Directory Connector item and then click Properties. In the new window, navigate to the Select Attributes option in the left pane.
In the Select Attributes list, uncheck boxes next to attributes that you do not want to replicate to Office 365, e.g. contact details, company information etc. Confirm your choice by clicking the OK button. This setting is useful when the information present in the Cloud is not present in the local AD and you do not want to lose it. Synchronization works in one direction, from on-prem server to the Cloud, and always overwrites data in Office 365.
The final step is to start the synchronization task – to do so you need to right-click Active Directory Connector in the Management Agents tab and select Run.
Select Full Import Full Sync and confirm by clicking OK.
That’s it – your passwords are now in one-way sync between the on-prem server and the Office 365 organization.
What to be aware of?
There are a couple of options and limitations you need to bear in mind when setting up password sync with the DirSync tool:
- All passwords synced to the Cloud are set to Password never expires. This might cause passwords synced from the local domain to be still valid in Office 365, even when they have already expired locally.
- When changing a user’s password in the local AD, remember to uncheck the User must change password at next login option as it might cause the user to be unable to sign in to their Office 365 account.
- When disabling an account in your local AD, keep in mind that this change is synced in a standard timeframe (which by default is three hours). Therefore, this might create a situation, where the user unable to login locally on a workstation is still able to login to their account in Office 365.


